Sometimes it is important to verify a downloaded file. For example, the ISO image of a Linux distribution - it contains the operating system that you will use or install on your computer, bad things may happen if the file was corrupted during download or tampered by a man-in-the-middle attack.
Two common verifications that greatly reduce chances of using a corrupted or tampered file are checksum and digital signature:
- a checksum is made by who creates and uploads the file, before uploading, and later verified by who downloads the file, after downloading. There are some algorithms to compute checksums, but the general idea behind them is to sum all bytes of the file. When verifying the checksum of a downloaded file, if the file or the checksum itself were modified, verification fails, indicating it is not safe to use the file; and
- a digital signature certifies a file, similar to a hand-written signature, but has the advantage of being tamper-resistant, because it uses encryption mechanisms. When verifying the digital signature of a downloaded file, if the file or the signature itself were modified, or if the signature was made using another person’s key, verification fails, indicating it is not safe to use the file.
Those verifications are for integrity and authenticity respectively, two basic properties of information security.
Linux distributions often provide SHA-256 checksums and GPG digital signatures to verify their ISO images.
In this post, you are going to see how to do those verifications with sha256sum and gpg (from GNU Privacy Guard, also known as GnuPG or simply GPG), two command-line utilities that come already installed on most Linux distributions by default.

Although I use the example of an ISO image, any file can be verified, as long as there are a checksum and a digital signature available. For instance, that is the case of the files available for download on the VeraCrypt software website.
Tip: if you don’t use Linux yet and is using Windows to download a Linux distribution ISO image, read this page instead.
For future reference, here I use the openSUSE Leap 15.0 Linux distribution and the sha256sum and gpg utilities on the versions available on the official repositories of the distribution.
If you have never used the Linux command-line interface (also known as terminal), don’t be afraid: you’re going to see that it’s not difficult at all!
Overview
The process of checking an ISO image is not so simple, so before we roll up our sleeves, let’s get an overview of it:
- Download the ISO image from the Linux distribution’s website (as usual);
- Download checksum and digital signature from the Linux distribution’s website, depending on the distribution they can be two files or a single text file containing both (openSUSE provides them as a single text file);
- Import the public PGP key belonging to the Linux distribution, depending on the distribution you may get that key from the distribution’s website or from a trusted key server (here we are going to retrieve the openSUSE key from a key server, but it is also available on the downloads page);
- Compute the checksum of the downloaded ISO image and compare it against the expected checksum, provided by the distribution; and
- Verify the digital signature, which might have been computed against the ISO image itself or against the checksum file, which is better, because authenticity protection is extended to the checksum file (openSUSE has made it the second way).
The process may differ a bit according to the distribution, but it usually follows that general pattern. For example, there are several different checksum algorithms. The MD5 algorithm has been the most popular, but has been replaced by the SHA-256 algorithm, which is theoretically more resistant to attacks. Also some distros don’t provide digital signatures, users of those distros are more vulnerable to man-in-the-middle attacks.
Using Terminal
Terminal is an application that receives text-based commands. It is different from most applications, which you control using the mouse and clicking on buttons and menus.
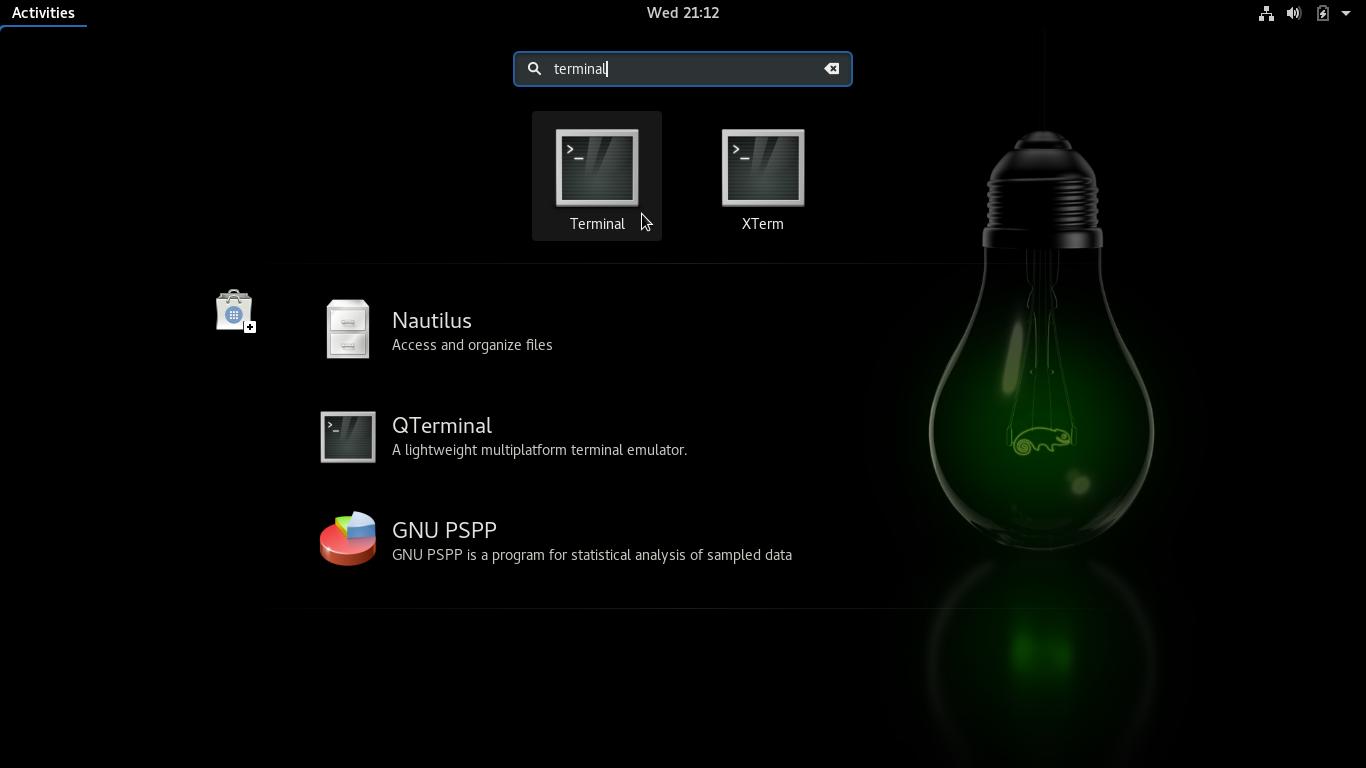
To start Terminal, open the Activities overview, clicking Activities, on the top-left corner of the screen, or pressing the Super key (on some keyboards, it shows the Windows logo). Type terminal and click its icon:
Terminal is launched. It shows an almost empty window with a cursor blinking after a character, which can be > (greater than) or $ (dollar sign):
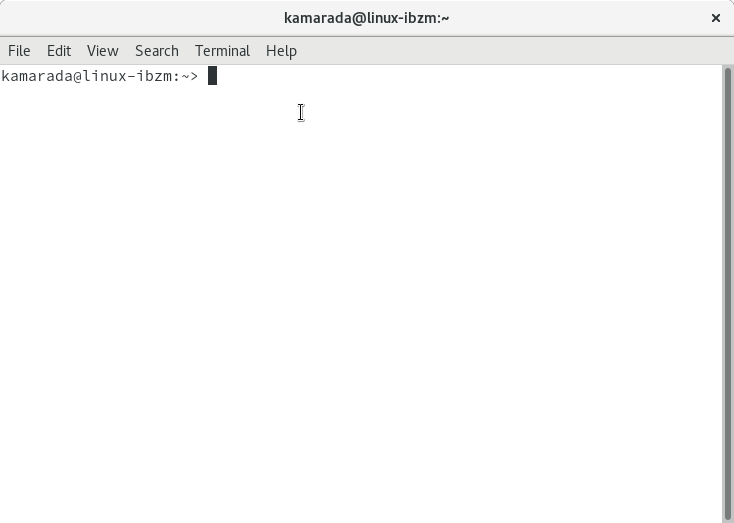
That character indicates the command will be executed by an ordinary user.
To execute a command (also said as run a command), you need to type it and press Enter.
In the following sections, we are going to execute some commands.
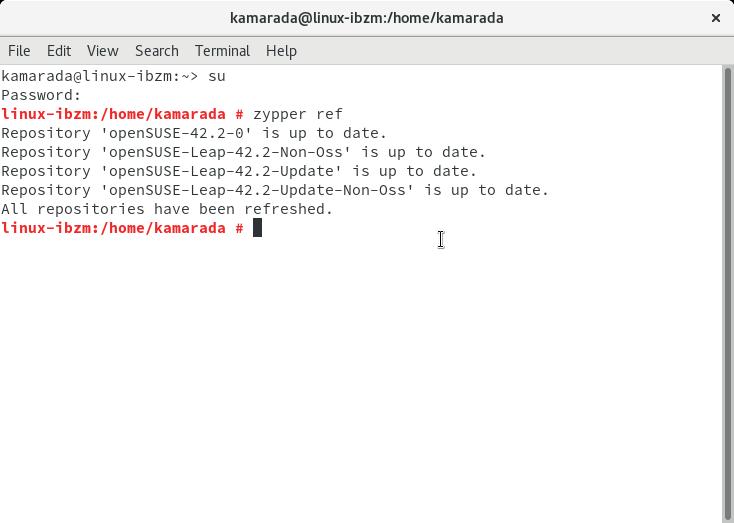
If Terminal is being used by the administrator (also known as superuser or root user), it shows the hash character (#). An example of another post:
If you are familiar with Windows, perhaps you think Terminal resembles Windows’ Command Prompt.
1 & 2) Download the openSUSE ISO image
Download the openSUSE Leap network installation image as well as the checksum file from:
https://software.opensuse.org/distributions/leap
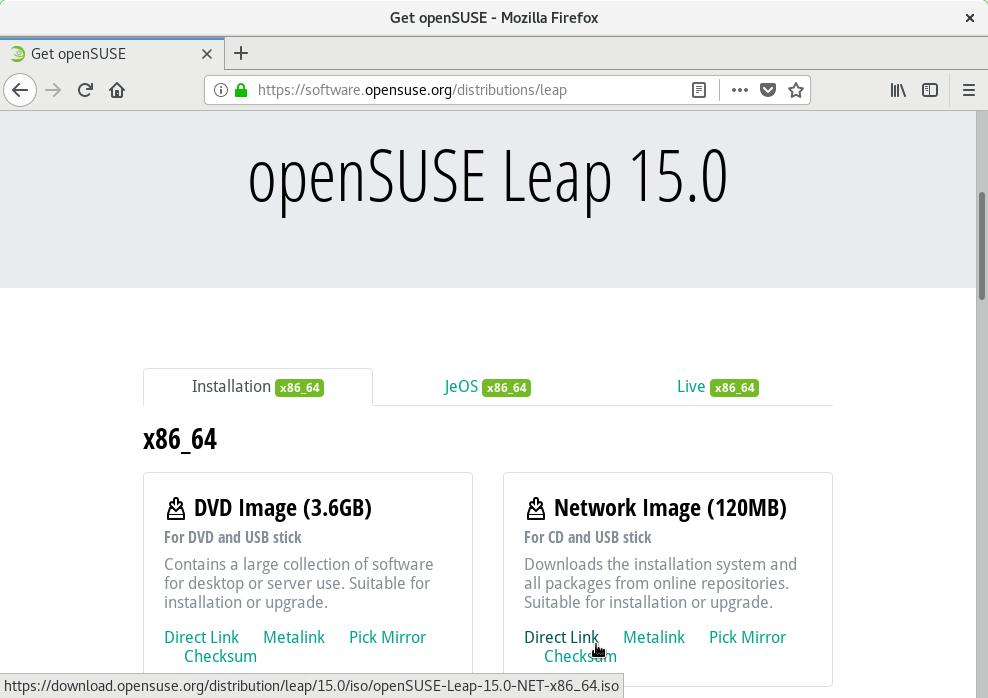
I chose the network installation image just to illustrate, because it’s the smaller image available for download.
When you finish downloading, there should be two files in your Downloads folder:
- the ISO image (
openSUSE-Leap-15.0-NET-x86_64.iso) and - the checksum file (
openSUSE-Leap-15.0-NET-x86_64.iso.sha256).
3) Import the openSUSE public key
Scroll down the Get openSUSE page and see the large hexadecimal number on the Verify Your Download Before Use section:
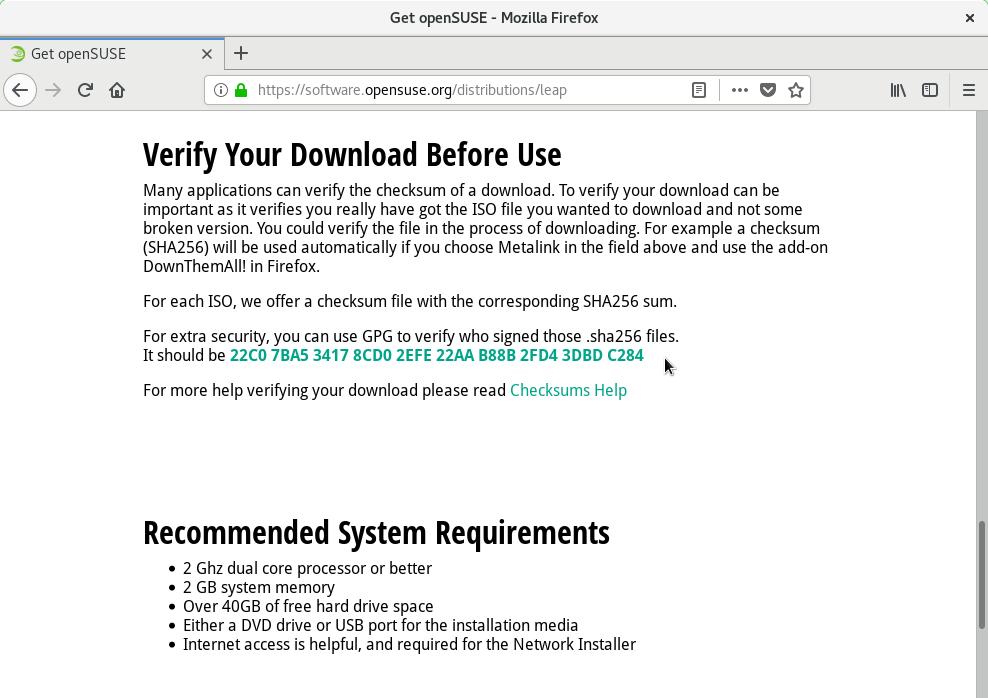
That number is the fingerprint of the openSUSE Project public GPG key.
To import that key, run the following command, informing the fingerprint last 8 digits:
1
$ gpg --recv-keys 3DBDC284
Tip: you can copy from and paste to the Terminal. To do that, use the Ctrl + Shift + C and Ctrl + Shift + V keyboard shortcuts respectively.
When running that command, terminal shows the following text, which is the output (or return) of that command:
1
2
3
4
5
6
7
8
gpg: directory '/home/kamarada/.gnupg' created
gpg: keybox '/home/kamarada/.gnupg/pubring.kbx' created
gpg: key B88B2FD43DBDC284: 20 signatures not checked due to missing keys
gpg: /home/kamarada/.gnupg/trustdb.gpg: trustdb created
gpg: key B88B2FD43DBDC284: public key "openSUSE Project Signing Key <opensuse@opensuse.org>" imported
gpg: no ultimately trusted keys found
gpg: Total number processed: 1
gpg:               imported: 1
Shortly, gpg informs that it has created some configuration files, because it has been executed for the first time, and imported the openSUSE key.
Run the following command to check the fingerprint of the imported key:
1
$ gpg --fingerprint 3DBDC284
It returns:
1
2
3
pub   rsa2048 2008-11-07 [SC] [expires: 2024-05-02]
      22C0 7BA5 3417 8CD0 2EFE  22AA B88B 2FD4 3DBD C284
uid           [ unknown] openSUSE Project Signing Key <opensuse@opensuse.org>
Compare the fingerprint returned by gpg with the one present on the openSUSE website:
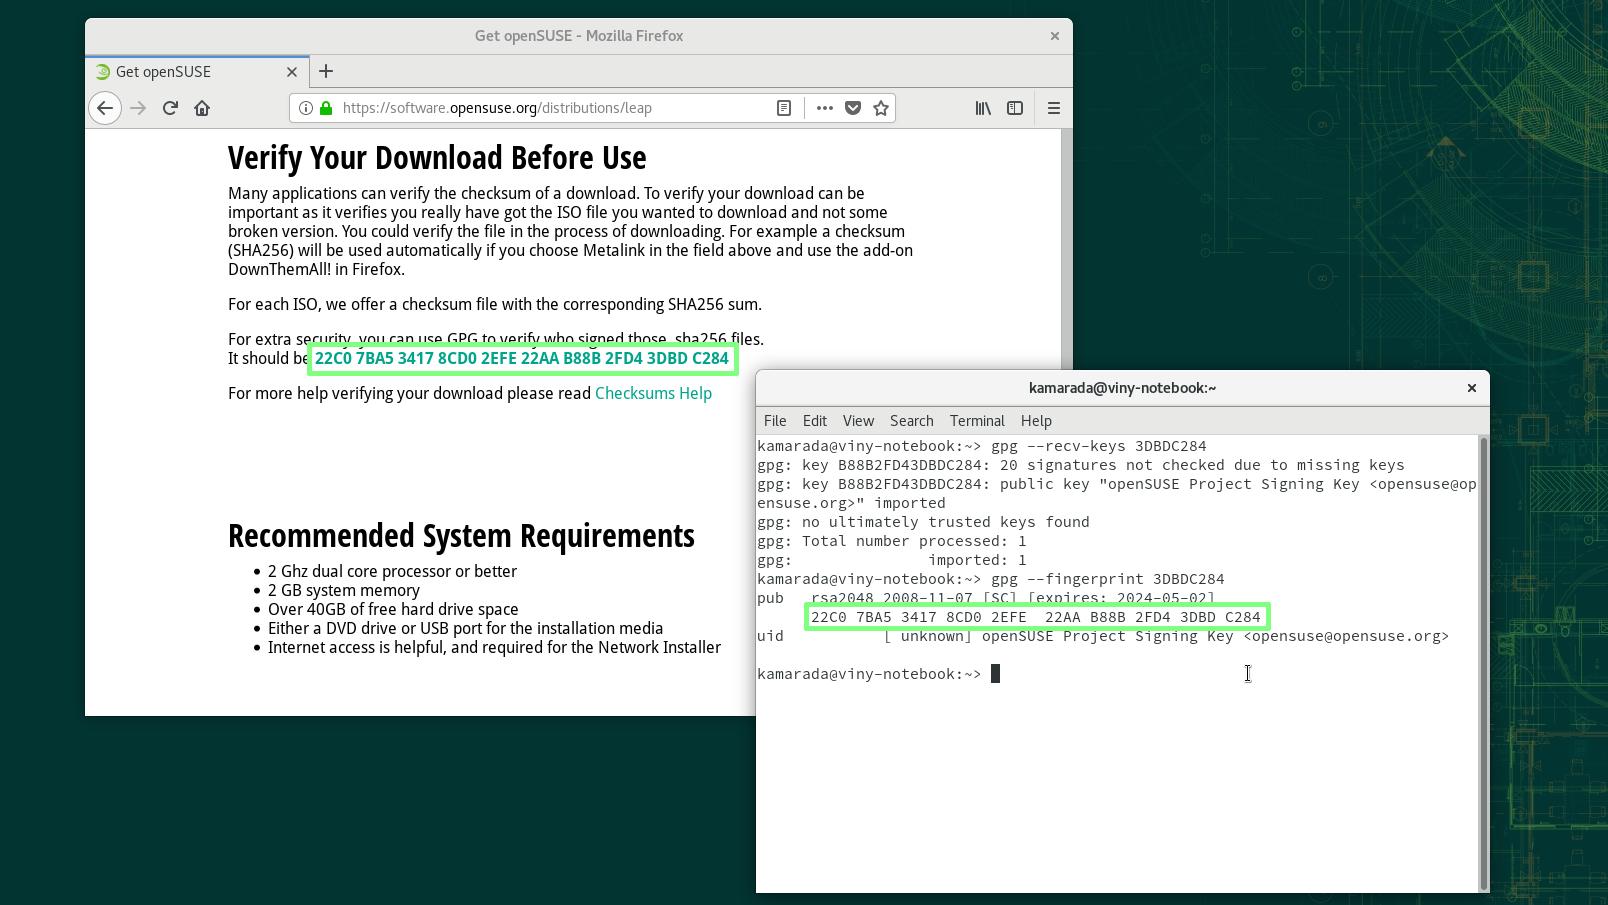
If the numbers match, you successfully imported the openSUSE Project public GPG key.
4) Verify the checksum
On terminal, enter the Downloads folder with the command:
1
$ cd Downloads
Then, verify the checksum of the ISO image using the sha256sum utility:
1
$ sha256sum -c openSUSE-Leap-15.0-NET-x86_64.iso.sha256
(note that in the command you need to inform the checksum file name, which ends with .iso.sha256, not the ISO image file name, which ends with .iso)
sha256sum takes some time computing the downloaded ISO image checksum and compares it against the expected checksum, present on the checksum file.
The command output should be:
1
2
openSUSE-Leap-15.0-NET-x86_64.iso: OK
sha256sum: WARNING: 14 lines are improperly formatted
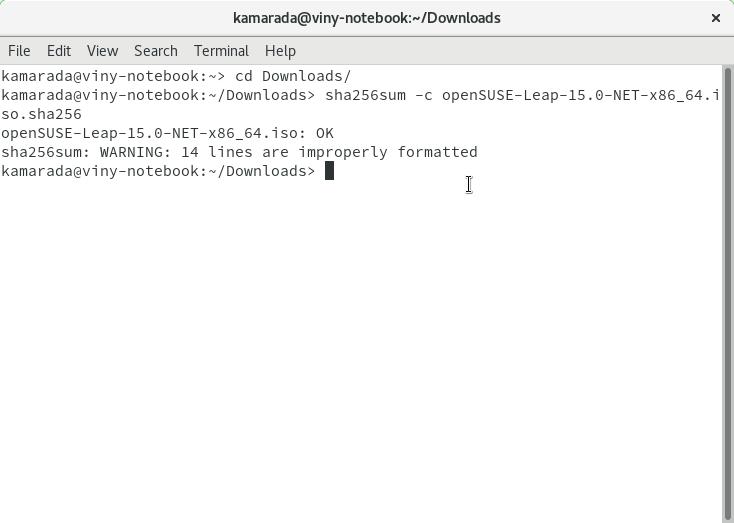
The first line means checksums match. So, from the integrity point of view, it is safe to use the downloaded ISO image. You can proceed to the authenticity verification.
If there is difference between the computed and the expected checksums, the command output is different. If that is the case, it is not safe to use the downloaded ISO image: it is broken and should be downloaded again.
The second line warns about some lines of the checksum file that sha256sum does not understand. Those lines are the digital signature, which the openSUSE Project writes on the same file. Just for the sake of curiosity, if you want to see those lines, you can open the checksum file using the terminal itself, since it is a text file:
1
$ cat openSUSE-Leap-15.0-NET-x86_64.iso.sha256
The cat command shows the contents of a text file. Look:
1
2
3
4
5
6
7
8
9
10
11
12
13
14
15
-----BEGIN PGP SIGNED MESSAGE-----
Hash: SHA256

1a322de7c215da96fdbad4c247d218eb79073c5620a332a759c0291b44746fbc  openSUSE-Leap-15.0-NET-x86_64.iso
-----BEGIN PGP SIGNATURE-----
Version: GnuPG v1.0.7 (GNU/Linux)

iQEVAwUBWv2l17iLL9Q9vcKEAQgYyAf8DFVIKlbzmTteoIXCyxTO78QbJl764CvS
Vf+deIEIfyHwvHIFR9diQm3gWeSuxD4dE+rhmRrDZBXsOIf1Xr1cXCAOWfr6zn5E
8CurCwfYF4rKYu6wGqGJgf5WMh9E3swpJTfH4izvkRrGEDK13NRQcnXdhJYn5cJa
9tC8n9sNdmzGSwaK44WCxhoN5+8EgJoJQTh1m3n7+O5xD6un9MD7Xh8dlfBxBMtV
N0zZxCBEBbg+fL+/I7793R8RbZZwxihES4xmn2BLF5GeC28xBaWblbWmVBbo8un1
aJu8EqdG3Kn43bX1FwAecNgRov7PSFGua/38ANdLWMsBpV6jNpMoyA==
=YLLc
-----END PGP SIGNATURE-----
The sha256sum utility understands only this line:
1
1a322de7c215da96fdbad4c247d218eb79073c5620a332a759c0291b44746fbc  openSUSE-Leap-15.0-NET-x86_64.iso
It does not understand all the others, that’s why it shows that warning.
5) Verify the digital signature
To verify the GPG signature of the ISO image, use the gpg utility:
1
$ gpg --verify openSUSE-Leap-15.0-NET-x86_64.iso.sha256
(once again we refer to the checksum file name, which ends with .iso.sha256)
The gpg output should inform Good signature:
1
2
3
4
5
6
gpg: Signature made qui 17 mai 2018 12:55:03 -03
gpg:                using RSA key B88B2FD43DBDC284
gpg: Good signature from "openSUSE Project Signing Key <opensuse@opensuse.org>" [unknown]
gpg: WARNING: This key is not certified with a trusted signature!
gpg:          There is no indication that the signature belongs to the owner.
Primary key fingerprint: 22C0 7BA5 3417 8CD0 2EFE  22AA B88B 2FD4 3DBD C284
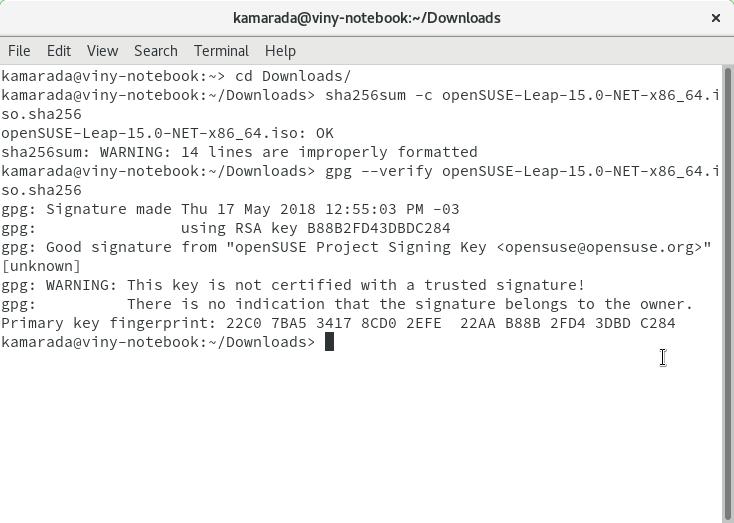
The warning This key is not certified with a trusted signature does not really indicate a problem, but only the fact that you have not signed the key yourself. The next section shows how to optionally correct this.
If you received the above output, unless you are paranoid, you can feel satisfied and use the ISO image safely.
Look how the output is different if the signature verification fails:
1
2
3
4
5
gpg: CRC error; 60B2DC - 60B2DB
gpg: no signature found
gpg: the signature could not be verified.
Please remember that the signature file (.sig or .asc)
should be the first file given on the command line.
If you received that output, it is not safe to use that ISO image. You should check its origin and download it again.
6) Optionalities
At this point, you have done all the steps we have outlined in the overview at the beginning.
However, you could go a step further by signing the openSUSE Project public key with your private key. Doing that, you tell gpg you trust that the openSUSE Project public key actually belongs to the openSUSE Project.
It may seem bureaucratic, but the way GPG was designed, ideally people should exchange keys only in person to establish a web of trust. Real life people don’t use it that way. Obtaining the public key from the distribution website is all you can reasonably do as an end-user trying to verify a downloaded ISO image. Anyway, you’re still safer than people who simply download and trust it without verifying it at all.
To sign the openSUSE public GPG key, you must first create your own GPG key pair.
6.1) Generate a personal key pair
To start generating a key pair, run the following command on terminal:
1
$ gpg --gen-key
gpg asks you to provide your name:
1
2
3
4
5
6
7
8
9
gpg (GnuPG) 2.2.5; Copyright (C) 2018 Free Software Foundation, Inc.
This is free software: you are free to change and redistribute it.
There is NO WARRANTY, to the extent permitted by law.

Note: Use "gpg2 --full-generate-key" for a full featured key generation dialog.

GnuPG needs to construct a user ID to identify your key.

Real name:
Type your complete name and press Enter.
Then, gpg asks your email address. Type it and press Enter.
gpg offers you the opportunity to review your information and change it if necessary:
1
2
3
4
5
6
Real name: Linux Kamarada
Email address: linux@kamarada.com.br
You selected this USER-ID:
    "Linux Kamarada <linux@kamarada.com.br>"

Change (N)ame, (E)mail, or (O)kay/(Q)uit?
If everything is alright, type O and press Enter.
gpg asks you to create a password (passphrase) to protect your new private key. For some reason, it provides a window outside the terminal for entering the password:
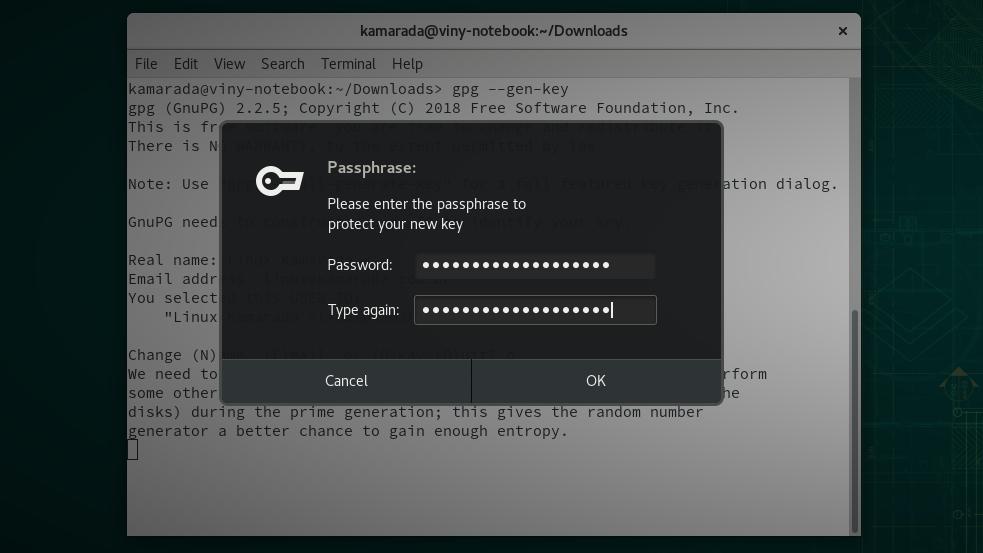
Enter the password in the first field and repeat it in the second field to make sure there is no typo. When you are finished, click OK (or press Enter).
After that, your personal key pair is generated:
1
2
3
4
5
6
7
8
9
10
11
12
13
14
15
16
17
18
Change (N)ame, (E)mail, or (O)kay/(Q)uit? o
We need to generate a lot of random bytes. It is a good idea to perform
some other action (type on the keyboard, move the mouse, utilize the
disks) during the prime generation; this gives the random number
generator a better chance to gain enough entropy.
We need to generate a lot of random bytes. It is a good idea to perform
some other action (type on the keyboard, move the mouse, utilize the
disks) during the prime generation; this gives the random number
generator a better chance to gain enough entropy.
gpg: key 203CFD6387754CFF marked as ultimately trusted
gpg: directory '/home/kamarada/.gnupg/openpgp-revocs.d' created
gpg: revocation certificate stored as '/home/kamarada/.gnupg/openpgp-revocs.d/A6EA439A6BC66CC857C85700203CFD6387754CFF.rev'
public and secret key created and signed.

pub   rsa2048 2018-11-06 [SC] [expires: 2020-11-05]
      A6EA439A6BC66CC857C85700203CFD6387754CFF
uid                      Linux Kamarada <linux@kamarada.com.br>
sub   rsa2048 2018-11-06 [E] [expires: 2020-11-05]
6.2) Sign the openSUSE public key
To sign the openSUSE public key, run:
1
$ gpg --edit-key 3DBDC284
gpg shows information about the key and starts its own terminal (starting with gpg>):
1
2
3
4
5
6
7
8
9
10
11
gpg (GnuPG) 2.2.5; Copyright (C) 2018 Free Software Foundation, Inc.
This is free software: you are free to change and redistribute it.
There is NO WARRANTY, to the extent permitted by law.


pub  rsa2048/B88B2FD43DBDC284
     created: 2008-11-07  expires: 2024-05-02  usage: SC
     trust: unknown       validity: unknown
[ unknown] (1). openSUSE Project Signing Key <opensuse@opensuse.org>

gpg>
Compare the fingerprint with the one present on the openSUSE website once more.
To do that, type fpr (from fingerprint) and press Enter:
1
2
3
4
5
gpg> fpr
pub   rsa2048/B88B2FD43DBDC284 2008-11-07 openSUSE Project Signing Key <opensuse@opensuse.org>
 Primary key fingerprint: 22C0 7BA5 3417 8CD0 2EFE  22AA B88B 2FD4 3DBD C284

gpg>
If the numbers match, type trust and press Enter:
1
2
3
4
5
6
7
8
9
10
11
12
13
14
15
16
17
gpg> trust
pub  rsa2048/B88B2FD43DBDC284
     created: 2008-11-07  expires: 2024-05-02  usage: SC
     trust: unknown       validity: unknown
[ unknown] (1). openSUSE Project Signing Key <opensuse@opensuse.org>

Please decide how far you trust this user to correctly verify other users' keys
(by looking at passports, checking fingerprints from different sources, etc.)

  1 = I don't know or won't say
  2 = I do NOT trust
  3 = I trust marginally
  4 = I trust fully
  5 = I trust ultimately
  m = back to the main menu

Your decision?
gpg asks you how far you trust that key. I decided to trust it 100% (5 of 5) so I typed 5 and pressed Enter:
1
2
Your decision? 5
Do you really want to set this key to ultimate trust? (y/N)
It asks if you really want to trust this key, type y (yes) and press Enter:
1
2
3
4
5
6
7
8
9
10
Do you really want to set this key to ultimate trust? (y/N) y

pub  rsa2048/B88B2FD43DBDC284
     created: 2008-11-07  expires: 2024-05-02  usage: SC
     trust: ultimate      validity: unknown
[ unknown] (1). openSUSE Project Signing Key <opensuse@opensuse.org>
Please note that the shown key validity is not necessarily correct
unless you restart the program.

gpg>
Now type sign and press Enter:
1
2
3
4
5
6
7
8
9
10
11
12
13
14
gpg> sign

pub  rsa2048/B88B2FD43DBDC284
     created: 2008-11-07  expires: 2024-05-02  usage: SC
     trust: ultimate      validity: unknown
 Primary key fingerprint: 22C0 7BA5 3417 8CD0 2EFE  22AA B88B 2FD4 3DBD C284

     openSUSE Project Signing Key <opensuse@opensuse.org>

This key is due to expire on 2024-05-02.
Are you sure that you want to sign this key with your
key "Linux Kamarada <linux@kamarada.com.br>" (203CFD6387754CFF)

Really sign? (y/N)
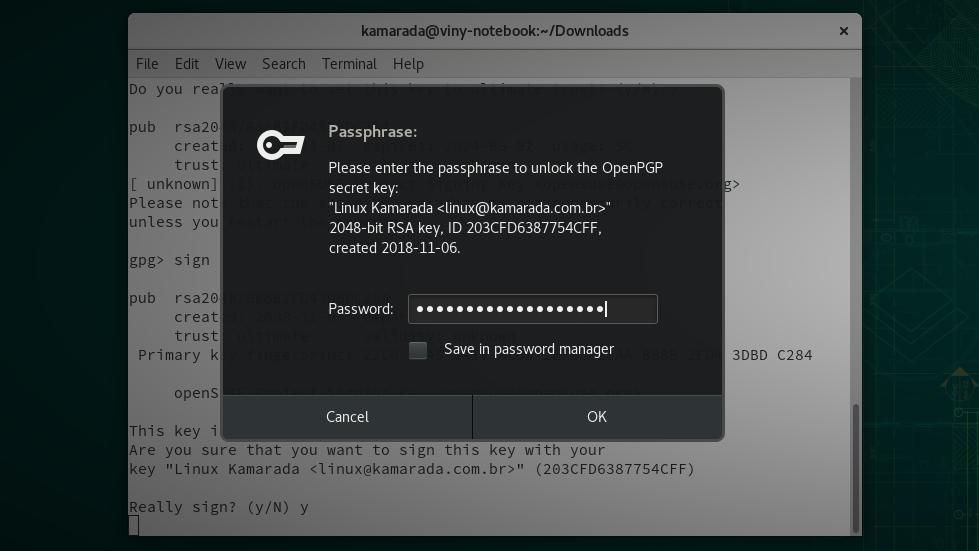
It asks if you really want to sign this key, type y and press Enter:
Enter your private key password and click OK (or press Enter):
Finally, type quit and press Enter:
1
2
gpg> quit
Save changes? (y/N)
It asks if you want to save changes, type y and press Enter.
The openSUSE public key is signed and we return to the ordinary terminal.
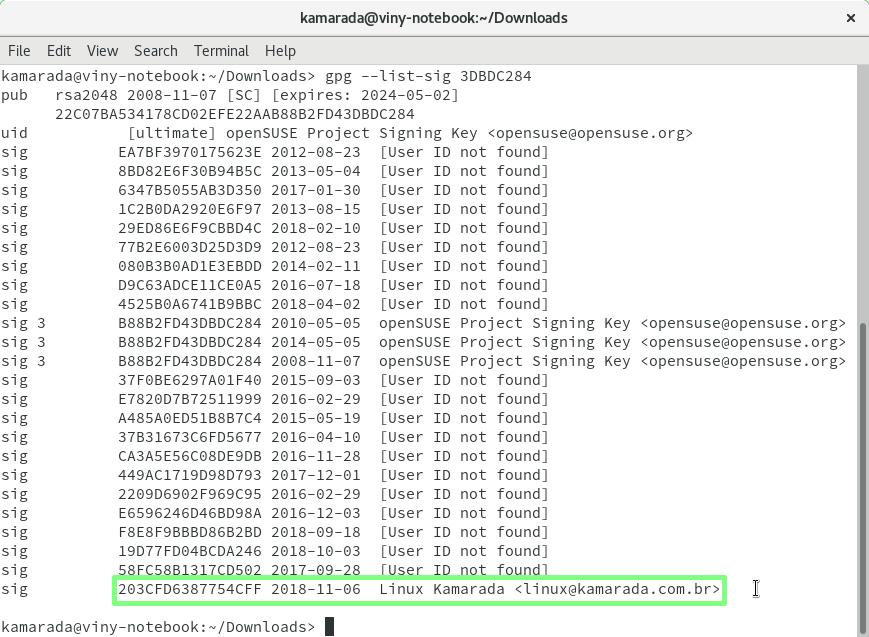
Confirm that the key has been actually signed running:
1
$ gpg --list-sig 3DBDC284
That command lists all signatures of the key. Note that yours appears on the last line:
1
2
3
4
5
6
7
8
9
10
11
12
13
14
15
16
17
18
19
20
21
22
23
24
25
26
27
pub   rsa2048 2008-11-07 [SC] [expires: 2024-05-02]
      22C07BA534178CD02EFE22AAB88B2FD43DBDC284
uid           [ultimate] openSUSE Project Signing Key <opensuse@opensuse.org>
sig          EA7BF3970175623E 2012-08-23  [User ID not found]
sig          8BD82E6F30B94B5C 2013-05-04  [User ID not found]
sig          6347B5055AB3D350 2017-01-30  [User ID not found]
sig          1C2B0DA2920E6F97 2013-08-15  [User ID not found]
sig          29ED86E6F9CBBD4C 2018-02-10  [User ID not found]
sig          77B2E6003D25D3D9 2012-08-23  [User ID not found]
sig          080B3B0AD1E3EBDD 2014-02-11  [User ID not found]
sig          D9C63ADCE11CE0A5 2016-07-18  [User ID not found]
sig          4525B0A6741B9BBC 2018-04-02  [User ID not found]
sig 3        B88B2FD43DBDC284 2010-05-05  openSUSE Project Signing Key <opensuse@opensuse.org>
sig 3        B88B2FD43DBDC284 2014-05-05  openSUSE Project Signing Key <opensuse@opensuse.org>
sig 3        B88B2FD43DBDC284 2008-11-07  openSUSE Project Signing Key <opensuse@opensuse.org>
sig          37F0BE6297A01F40 2015-09-03  [User ID not found]
sig          E7820D7B72511999 2016-02-29  [User ID not found]
sig          A485A0ED51B8B7C4 2015-05-19  [User ID not found]
sig          37B31673C6FD5677 2016-04-10  [User ID not found]
sig          CA3A5E56C08DE9DB 2016-11-28  [User ID not found]
sig          449AC1719D98D793 2017-12-01  [User ID not found]
sig          2209D6902F969C95 2016-02-29  [User ID not found]
sig          E6596246D46BD98A 2016-12-03  [User ID not found]
sig          F8E8F9BBBD86B2BD 2018-09-18  [User ID not found]
sig          19D77FD04BCDA246 2018-10-03  [User ID not found]
sig          58FC58B1317CD502 2017-09-28  [User ID not found]
sig          203CFD6387754CFF 2018-11-06  Linux Kamarada <linux@kamarada.com.br>
6.3) Verify the digital signature (this time with the key signed)
Repeat verifying the GPG signature of the ISO image (step 5):
1
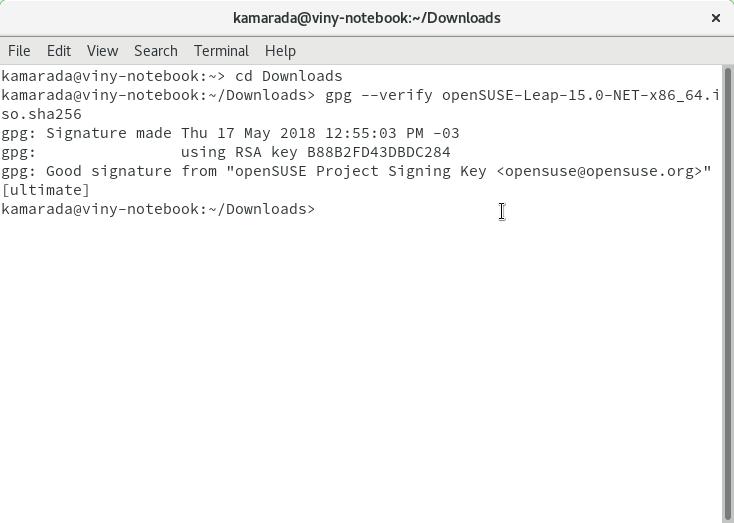
$ gpg --verify openSUSE-Leap-15.0-NET-x86_64.iso.sha256
Now gpg does not warn you the key is not trusted nor show its fingerprint at the end. gpg just informs Good signature:
1
2
3
gpg: Signature made qui 17 mai 2018 12:55:03 -03
gpg:                using RSA key B88B2FD43DBDC284
gpg: Good signature from "openSUSE Project Signing Key <opensuse@opensuse.org>" [ultimate]
Summing up
Now that you are familiar with sha256sum and gpg, you can use them to verify ISO images downloaded from openSUSE, as well as from other Linux distributions, or any files you need to verify. As I explained in the overview, the process is similar.
Possibly, much of what you did here you won’t have to do again:
- you only need to repeat importing the openSUSE public key (section 3) if the openSUSE Project generates a new key in the future;
- you only need to re-sign the openSUSE public key (section 6.2) if you import a new openSUSE key in the future; and
- if you use your personal GPG key only to check downloaded files, you do not need to create a new GPG key pair (section 6.1).
In case you download another ISO image from openSUSE (for instance, when there is a new release), skip step 3 and repeat steps 1, 2, 4 and 5.
In case you download an ISO image from another distribution, then you should repeat the entire process, optionally signing the public key of the distribution after importing it (section 6.2).
I hope this post has helped you. I leave the references in case you want to read more.
References
- How to Verify a Linux ISO’s Checksum and Confirm It Hasn’t Been Tampered With
- How to Verify an Electrum Download on Windows - Bitzuma
- How to verify the authenticity and integrity of a downloaded file on Linux - Xmodulo
- SDB:Download help - openSUSE
- The GNU Privacy Handbook
- GnuPrivacyGuardHowto
- digital signature - Verify a key was signed by another key - Information Security Stack Exchange


