Last Sunday, the daylight saving time (DST) ended in Brazil. When Brazilian clocks were about to reach Sun, Feb 19 2017, 00:00 Brasília summer time, they were turned backward 1 hour to Sat, Feb 18 2017, 23:00 Brasília standard time.
DST clock shifts occur every year, not only in Brazil. Many people may feel confusing to set their clocks forward and then backward a few months later.
Fortunately, computers are able to automatically adjust their time by syncing with public time servers available on the Internet. In this post you are going to see how to set up that synchronization using the NTP protocol.
](/files/2016/10/tux-time.png)
Source of the image: PCLinuxOS
Network Time Protocol (NTP) is a networking protocol for synchronizing the system time of all machines within a network (desktops, servers, switches, routers, etc.) from a reliable time source. It can be used to sync home desktops too, as long as they are connected to the biggest of all networks - the Internet.
To use that protocol to sync our system time, first we need to choose a time server to be our reference time source.
Pick up a time server
Where possible, you should try to use time servers that are close to your network location. This will help reduce variations in latency that may reduce your accuracy. If your network does not have a local NTP server, talk to your Internet service provider (ISP) to see if they have an NTP server available for use.
If your ISP does not provide an NTP server, don’t worry: there are plenty of public time servers available out there, many of them are listed at the NTP project official website. For instance, in Brazil we have the official time server provided by the NTP.br project. Official time in the United States is provided by two time agencies: the NIST and the USNO. Open the NTP project servers list and choose the closest server to you.
If you don’t want to decide by yourself which time server you are going to sync with, a good choice is to pick one of the NTP Pool project, which is a big virtual cluster of time servers providing NTP synchronization for millions of people around the world. Just set pool.ntp.org as your NTP server. That name is resolved by DNS to IP addresses for servers in or close to your country. For most people, that will give the best results. You can be more specific and prefix that name with your country code, for instance br.pool.ntp.org or us.pool.ntp.org. The NTP Pool project has a comprehensive list of available time servers grouped by zones.
Recently, Google has launched its own public NTP servers. To use them, configure your network settings to use time.google.com as your NTP server. Maybe they will succeed as the Google Public DNS did.
Set up your computer
How you are going to setup your computer to sync its time with the NTP server you chose depends on which operating systems are installed on the computer.
If you use only the openSUSE Linux, or have more than one Linux distribution installed (e.g. openSUSE and Ubuntu), I recommend that you setup only the distribution you use more often to sync your computer time. But you can have all of your Linuxes syncing time if you prefer, there is no problem.
If you use Linux and Windows, I recommend you to setup Linux to sync your computer time and adjust Windows default settings so they can talk. That setup, although recommended, is a little bit trickier. If you use Windows more often, it may be easier to let Windows sync your computer time and setup Linux to “just watch”.
You are going to see here all the possible scenarios.
Time syncing on Linux
Here I’m going to show how to setup time syncing via NTP on openSUSE. For other Linux distributions, please refer to their documentation.
Start the YaST Control Center by opening the Application Menu, pointing to System, and then clicking on YaST:

You will be asked the root password.
Select the System category, then click on Date and Time:
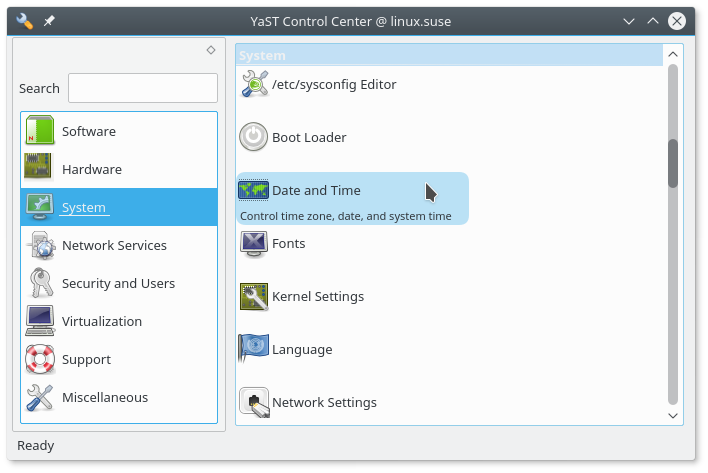
You are presented to the system date and time settings screen:
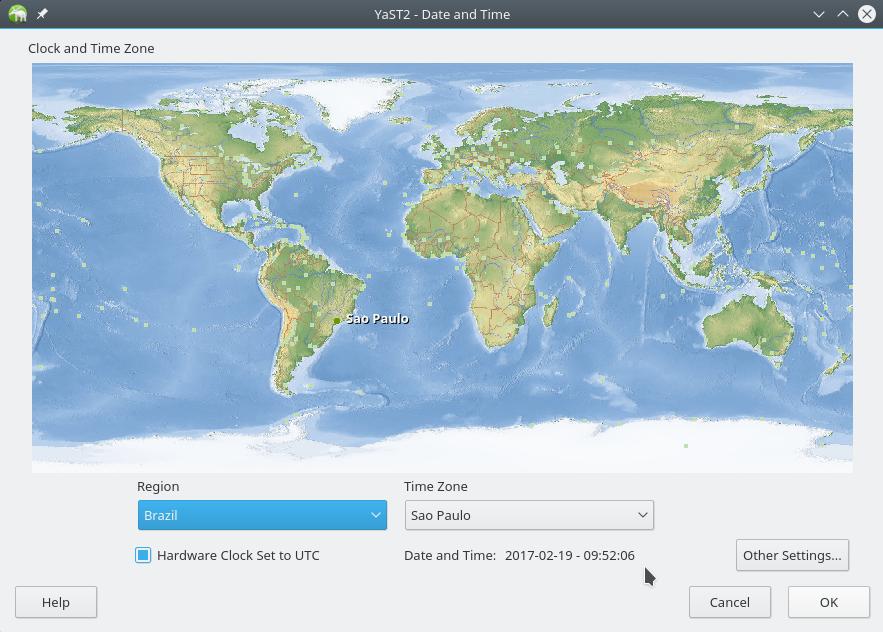
Check that your time zone is correct. If you need to change it, click on the map closest to your current location or use the Region and Time Zone dropdown menus below the map. On my machine, for instance, those fields are filled with Brazil and São Paulo (curiously, Brasília is not a time zone option, but São Paulo is in the same time zone).
Keep the Hardware Clock Set to UTC option checked. Without it, time syncing in Linux does not work (I will explain soon).
Click on Other Settings.
You go to the Change Date and Time screen:
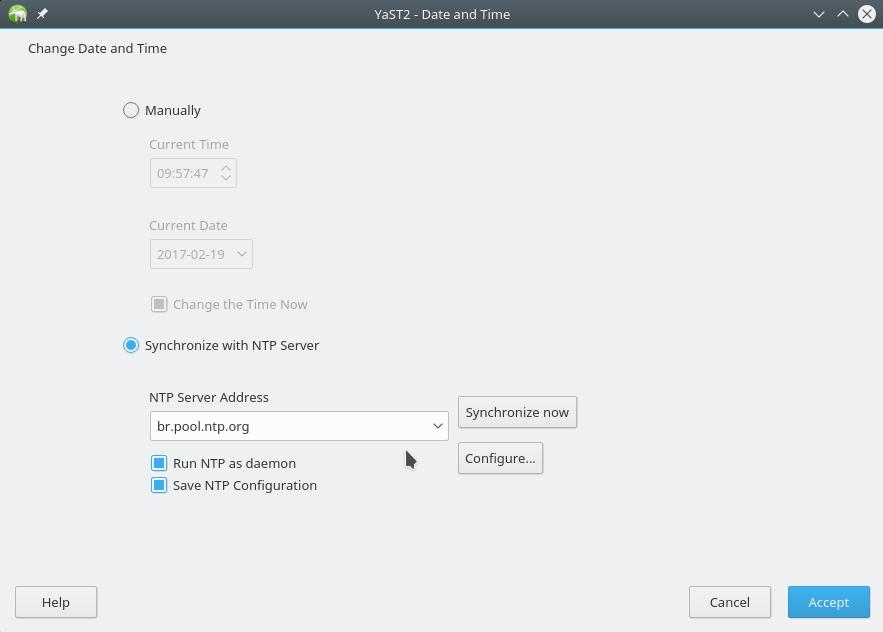
Check the Synchronize with NTP Server option.
On NTP Server Address, type the name or IP address of the NTP server you decided to use (e.g. br.pool.ntp.org).
Click on Synchronize now to sync your computer date and time right now.
Check the Run NTP as daemon and Save NTP Configuration options. They ensure that time will be constantly synced in background (“behind the scenes”). You won’t be notified about time syncing: you will know it’s always being done just because your computer time will always be right.
Click on Accept to return to the previous screen and then OK to leave date and time settings. You can also exit the YaST Control Center.
Time syncing on Windows
If you prefer to sync the system time with Windows, let’s first turn off time syncing on Linux.
Go to the date and time settings as explained above: open the Application Menu, point to System and click on YaST. You will be asked the root password. Once on YaST Control Center, select the System category and click on Date and Time.
On the Clock and Time Zone screen, click on Other Settings.
On the Change Date and Time screen, check the Manually option. Uncheck the Change the Time Now option and click on Accept:
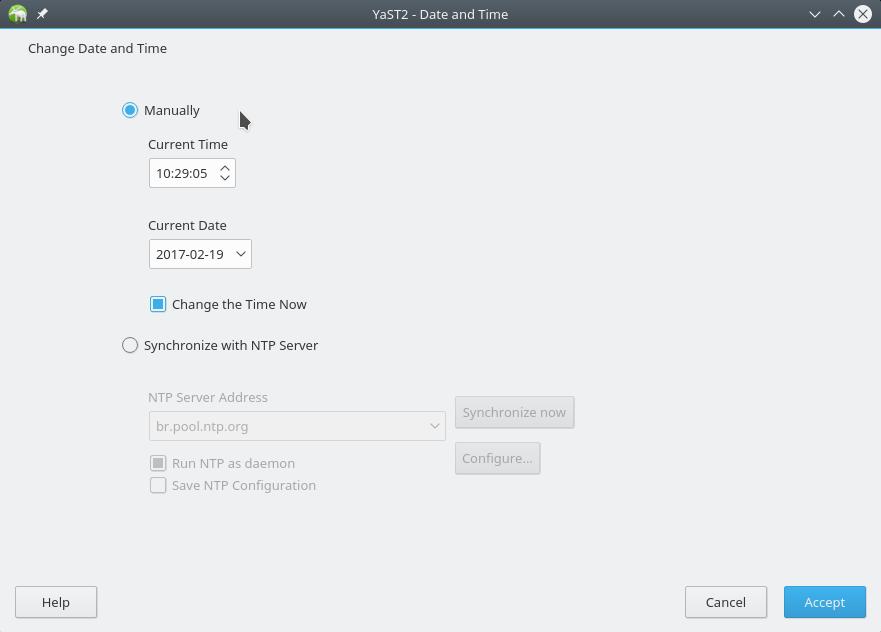
Back to the previous screen, uncheck the Hardware Clock Set to UTC option.
Click on OK to apply the new settings and leave that screen.
Reboot the computer.
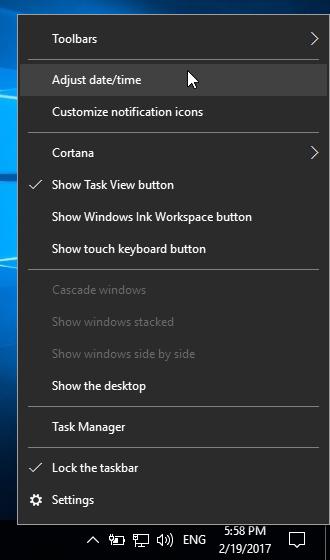
On Windows, right click on the Clock, on the bottom right corner of the screen, then click on Adjust date/time:
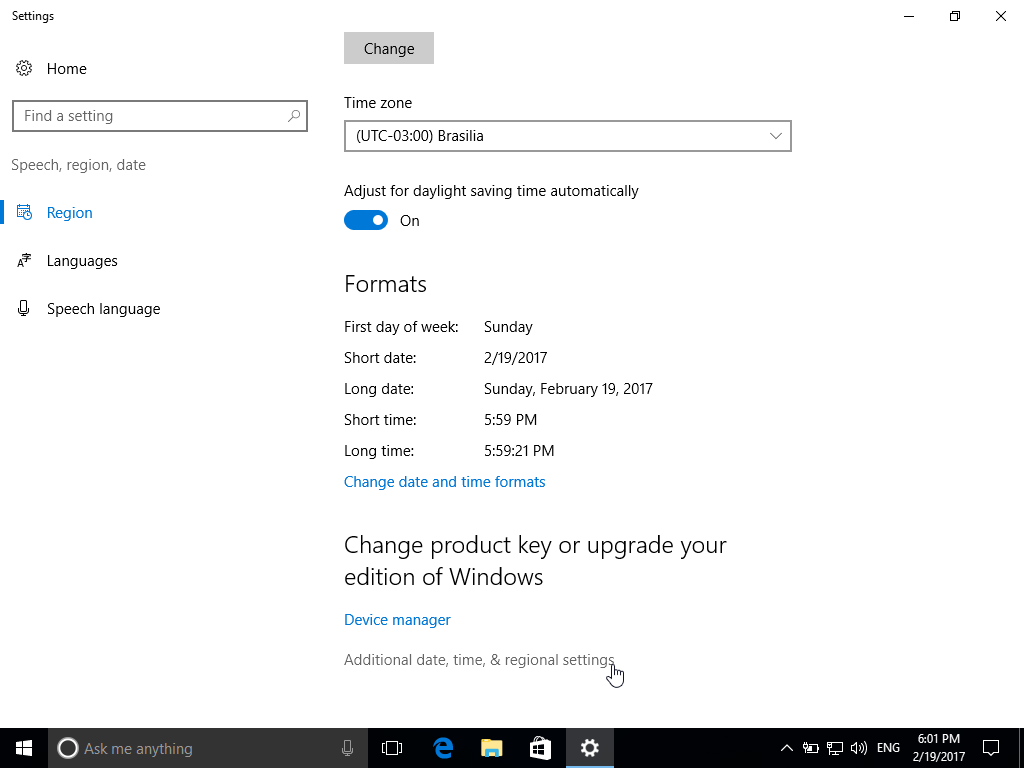
On the Date and time screen, check if the Time zone is correct. Mine, for instance, is (UTC-03:00) Brasília. If you need to change it, select one of the time zones listed on that dropdown menu. After that, click on Additional date, time, & regional settings:
On the Date and Time dialog box, switch to the Internet Time tab and click on Change settings:
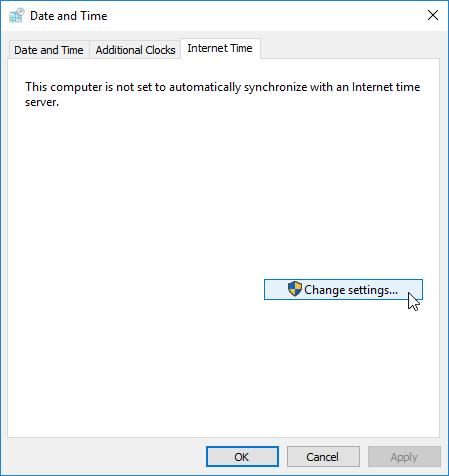
Make sure the Synchronize with an Internet time server option is checked:
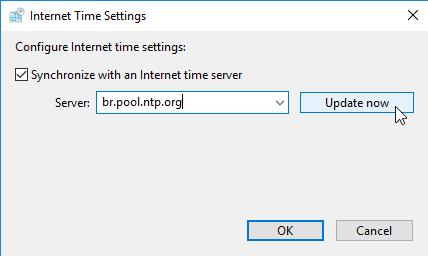
On Server, type the name or IP address of the NTP server you decided to use (e.g. br.pool.ntp.org).
Click on Update now to sync your computer date and time right now.
Click on OK to leave the Internet Time Settings dialog box. Then, click on OK to leave the Date and Time dialog box. You can also close the remaining windows.
A little more detail
Let me explain what is going on to the curious ones.
Time zones worldwide are defined in relation to UTC (Universal Coordinated Time). For most purposes, UTC is considered interchangeable with GMT (Greenwich Mean Time), which is the time zone of London when it is not in DST (daylight saving time). Being a time reference, UTC does not observe DST.
For instance, let’s take a look at the Brasília time. Outside of DST, it is 3 hours behind UTC (that’s why it is denoted UTC-03:00). During DST, it changes to 2 hours behind UTC (UTC−02:00). Let’s suppose you are reading this text in Brasília at 19:00 standard local time (not in DST). So, in London, it is 22:00 standard local time.
Computers have two clocks:
- a hardware clock, which works similarly to a wristwatch. If you open your computer, you will notice there is a clock battery there. You can check the hardware clock time by restarting your computer and accessing its motherboard setup (also known as BIOS or UEFI; refer to your motherboard’s or computer’s manual for more information); and
- a software clock, which is the one you actually see while using the operating system. Usually, it is shown in one of the screen corners.
Caution: do not open your computer or change your motherboard settings if you do not have enough technical knowledge or you may damage your machine!
By default, Windows and Linux manage those two clocks in different ways.
By default, Windows uses local time as reference and stores it directly on the hardware clock. Windows’ software clock displays the time informed by the hardware clock. Then, following our example (that we are in Brasília and it is 19:00 local time), if you set up Windows to manage your computer time as I explained above, you will notice both of your computer’s clocks will be at local time (19:00).
By default, Linux uses UTC as reference and stores the UTC time on the hardware clock. Linux’s software clock displays the calculated local time. To calculate local time, it takes into account the UTC time informed by the hardware clock, the time zone the system is set up to use and whether or not that time zone is in DST. Then, following our example, if you set up Linux to manage your computer time as I explained above, you will notice that your computer’s hardware clock shows UTC time (22:00), while its software clock shows local time (19:00).
The advantage of having the hardware clock as UTC is that you don’t need to adjust it when moving between timezones (if you travel around the world) or when DST begins or ends. The downside is that it may be confusing to access the motherboard setup and see a time different than local time, but we rarely need to access that setup, so we can let the operating system take care of the hardware clock.
It is possible to setup either of those systems to work differently.
In fact, I already showed how to setup Linux to work differently: hardware clock set to local time and managed by Windows, Linux must not touch it, just show its time on the screen. Let’s take a look into another (more interesting) possibility.
UTC on Windows
Now I’m going to show how to setup Windows to work differently: hardware clock set to UTC and software clock showing calculated local time, as Linux does. Although it’s not the easier setup, it’s the recommended one if you have both Linux and Windows installed on your computer.
The following procedure works only on Windows Vista SP2, Windows Server 2008, Windows 7 and newer versions of Windows. On earlier versions, working with hardware clock set to UTC was not documented nor officially supported by Microsoft. More information can be found here and here. If you use a newer version of Windows, you can safely disregard this warning. Just make sure your Windows installation is up-to-date.
Open the Start menu, type regedit on the search box, then right click on regedit and click on Run as administrator:

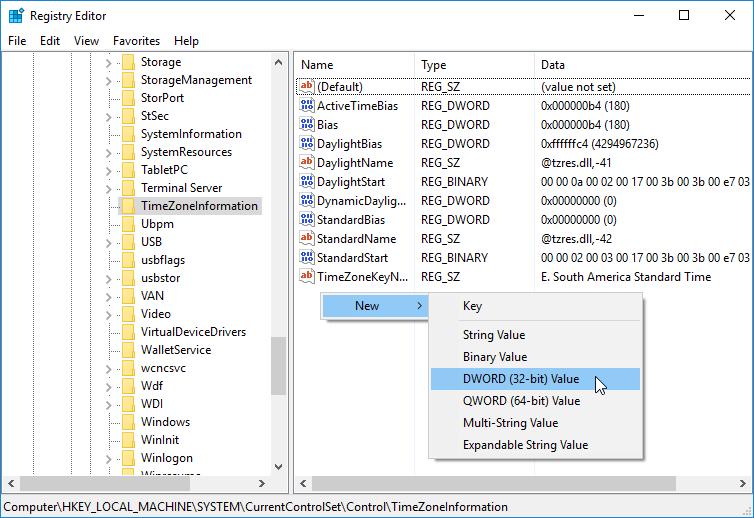
On the tree structure by the left, browse to the HKEY_LOCAL_MACHINE\SYSTEM\CurrentControlSet\Control\TimeZoneInformation registry key. Right click a free area of the window by the right, point to New and then click on DWORD (32-bit) Value:
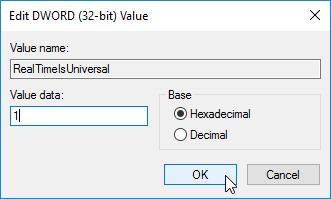
Type RealTimeIsUniversal and hit Enter. Then, double click the value you just created, give it a value of 1 and click on OK:
Close the Registry Editor and reboot the computer.
Go back to Linux and set it up to sync the computer time as I explained above.
Note that Windows is able to sync the time even if the hardware clock is set to UTC. Therefore, you can keep both Linux and Windows syncing your computer’s time.
I hope those tips can be useful to you, just as they have been useful to me. If you have any questions, don’t hesitate to comment!
Until next time!
References
- NTP.br
- SDB:Configuring the clock - openSUSE
-
[Time Synchronization with NTP Reference openSUSE Leap 42.2]opensuse-doc - UbuntuTime - Community Help Wiki
- Time - ArchWiki
- Why does Windows keep your BIOS clock on local time? - The Old New Thing
- IBM PC Real Time Clock should run in UT


