We haven’t talked about servers for a while… Today we are going to talk about security thinking on servers first, but on desktops too, either at home or at work. The Internet has made it much easier to access, send and share information. But together with the pros, come the cons: besides convenience, the Internet also brought a lot of risks and threats. A security solution that can be employed to prevent attacks and intrusions is the firewall.
A firewall is a software that monitors incoming and outgoing network packets and allows or blocks specific packets based on predefined security rules.
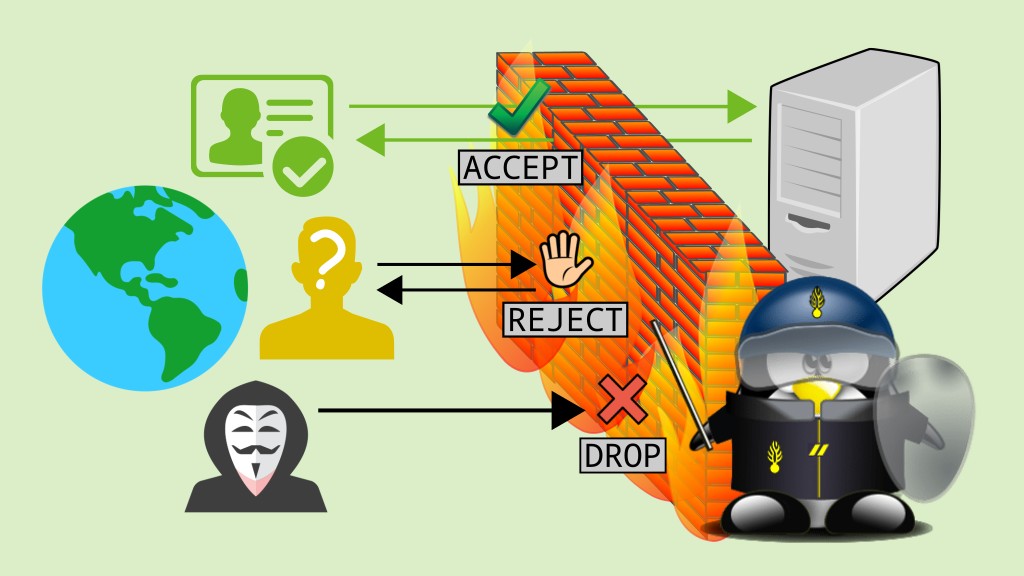
If analogies help you understand concepts, think of a firewall as a party security that checks people’s IDs and allows them to enter the party only if they are on the guest list.
Actually, there are also hardware-based firewalls, or mixed hardware and software solutions, but usually a firewall is a software installed on a server or desktop.
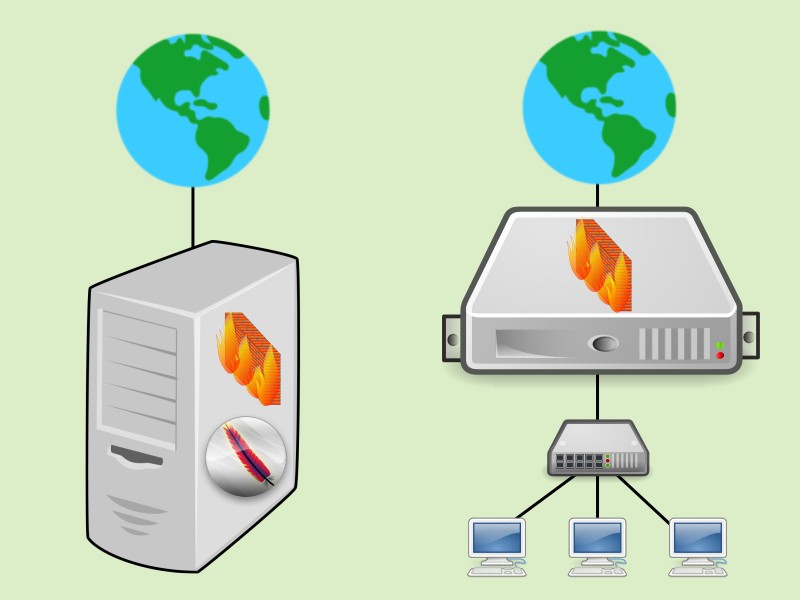
Depending on where a firewall is positioned, it can assume different roles. It can be installed:
- on any server (e.g. a web server) or desktop (e.g. a workstation) to protect the server or desktop itself;
- on a server positioned between the local network and the Internet, to protect the local network; or
- on a server that acts as a router among multiple internal networks, to protect them.
According to the layer of the TCP/IP model in which they operate, firewalls can be classified into:
- packet filters: act on the layers 2 (network) and 3 (transport) and are capable of filtering packets by source/destination address/port/interface, protocol (whether it is TCP, UDP, ICMP, etc). Packet filters date back to the first known firewalls. They are the simpler and more limited type of firewall, but already offer a significant level of security.
- application firewalls, better known as proxies: act on the layer 4 (application) and are capable of filtering packets based on their content. For instance, an HTTP proxy can block access to a page if there is a particular word in the URL, or if the requested website is known for piracy, gambling, pornography, malware, etc.
How is the firewall on Linux?
The Linux kernel comes with a built-in firewall, which is the ip_tables module. To manage it, we use the iptables command line tool.
Usually, people make things simpler and refer to both the kernel module and the command line tool as iptables, as if they were the same thing. Let’s do the same here.
iptables is primarily a packet filter, but it has modules that extend its functionality and allow it to act on the application layer. It comes pre-installed by default on most Linux distributions, including Linux Kamarada and openSUSE. That means we can just start using iptables: we don’t need to install anything before.
The original ip_tables module and iptables tool only handle IPv4. There are also ip6_tables and ip6tables for dealing with IPv6.
Many distributions provide alternative tools for managing the kernel built-in firewall. firewalld is a notable one and can be used from both the command line and the graphical user interface (which some people may find it easier to use). By default, new openSUSE installations come with iptables and firewalld on desktops, but only with iptables (without firewalld) on servers. Linux Kamarada, which is intended for desktops and beginner Linux users, also comes out-of-the-box with iptables and firewalld.
Today, we are going to focus on iptables. Perhaps another time we can talk about firewalld. We already mentioned it in another post. So, if you want to get an idea of what it looks like, see:
Basic concepts
To understand how iptables works, you need to know what are: rules, chains, tables, targets, and default policy.
A firewall rule specifies criteria for a packet (source/destination address/port/interface, protocol, etc.) and what to do with a packet that matches (such as block or allow).
A chain is a list of rules. iptables has its predefined chains and the user can also create their own chains.
Tables are sets of chains. iptables has four tables that are used at different times, detailed below: filter, nat, mangle and raw. Each table contains a number of built-in chains and may also contain user-defined chains. Today let’s focus on the filter table. Another time we can talk about the other ones.
filter: this is the default table, it contains 3 built-in chains:INPUT: queried when packets arrive at the machineOUTPUT: queried when packets should leave the machineFORWARD: queried when packets are to be routed through the machine (forwarded from one network interface to another, or from one machine to another through the current machine)
nat: this table is used to do NAT (Network Address Translation), it contains 3 built-in chains:PREROUTING,OUTPUTandPOSTROUTINGmangle: this table is used for specialized packet alteration, such as modifying the type of service (ToS) field, it contains 5 built-in chains:PREROUTING,OUTPUT,INPUT,FORWARDandPOSTROUTINGraw: this table is queried by iptables before the others and is used mainly for configuring exemptions from connection tracking, it contains 2 built-in chains:PREROUTINGandOUTPUT.
Note that chain names are case sensitive (e.g. INPUT, input and Input would be 3 different chains). Built-in chains names are always written in uppercase (e.g. INPUT).
When iptables receives a packet, it looks for a rule that describes that packet. Rules are examined in the order they were added to the chain. If the packet does not match the current rule, the next one in the chain is examined. If the packet does match, then iptables does what the rule says to do with the packet, which is called the target.
The target can be the name of a user-defined chain — in which case iptables continues processing the rules of that chain — or one of the following special values, which cause iptables to stop processing the current chain rules and take immediate action on the packet:
ACCEPT: let the packet throughDROP: discard (delete, ignore) the packet — in practice, it means to block the packetQUEUE: pass the packet to a userspace process (outside the kernel) that will process the packetRETURN: stop traversing the current chain and resume at the next rule in the previous (calling) chain
Finally, if iptables reaches the end of a built-in chain and no rule that matches the packet was found, the target specified by the default policy of the chain determines the fate of the packet. Only one of those four special targets can be set as default policy for a built-in chain.
There is also the REJECT target, which is similar to DROP, but can be used only in filter chains rules. More about the REJECT target later.
Does all of that sound confusing to you? Don’t worry: let’s get our hands dirty and everything will become clearer.
Listing current rules
We haven’t added any rules yet, but does our firewall have any rules already? Let’s see!
To list the rules currently in use by iptables, run the following command:
1
# iptables -L
Today we are going to use only the command line interface and almost all commands will be run with administrator privileges (i.e. as root). I suppose you already have some familiarity with Linux and the terminal.
The output of the above command should look something like:
1
2
3
4
5
6
7
8
Chain INPUT (policy ACCEPT)
target     prot opt source               destination

Chain FORWARD (policy ACCEPT)
target     prot opt source               destination

Chain OUTPUT (policy ACCEPT)
target     prot opt source               destination
This is the default iptables setup: all chains have a default policy of ACCEPT and no rules beforehand, which means that all incoming and outgoing traffic is allowed.
If that output is different for you, maybe the system administrator has already added rules, the Linux distribution you use has another default setting, or you are using firewalld, which creates its own chains. Next we are going to see how to delete these rules.
The filter table is considered by default if no table is specified. To list rules of another table, add the -t parameter (or --table) followed by the table name. For example:
1
2
3
4
5
6
7
8
9
10
11
12
# iptables -t nat -L
Chain PREROUTING (policy ACCEPT)
target     prot opt source               destination

Chain INPUT (policy ACCEPT)
target     prot opt source               destination

Chain OUTPUT (policy ACCEPT)
target     prot opt source               destination

Chain POSTROUTING (policy ACCEPT)
target     prot opt source               destination
Also, if no chain is selected, all chains are listed. To list rules of a specific chain only, add its name to the end of the command. For example:
1
2
3
# iptables -t mangle -L FORWARD
Chain FORWARD (policy ACCEPT)
target     prot opt source               destination
Deleting all current rules
Keep in mind that the order of your rules matters. So, it’s common to start setting up iptables by deleting any rules currently in use.
Do not try running the commands in this tutorial on a remote server that you access via SSH: you will risk losing access to the server.
To follow this tutorial, I recommend that you use a virtual machine. Doing that, you don’t modify your server or desktop firewall settings.
For more information, read:
To delete all the rules currently in use, run:
1
# iptables -F
Actually by default all the chains in the filter table are flushed if no table or chain are given.
In that sense, the iptables -F command is similar to the iptables -L command:
- to flush chains of another table, add the
-tparameter followed by the table name, and - to flush only a specific chain, add its name to the end of the command.
Examples:
1
2
3
# iptables -t nat -F
# iptables -t mangle -F POSTROUTING
Deleting all user-defined chains
Besides deleting rules, it’s also common to start deleting any user-defined chains.
To delete all user-defined chains in the filter table, run:
1
# iptables -X
Even if you haven’t created any chains yourself, if firewalld is running, that command deletes chains created by firewalld.
Similarly to previous commands, to specify a table, use the -t parameter, and to delete only a specific chain, add its name to the end of the command.
Note that it’s not possible to delete built-in chains, only user-defined chains.
In short, a complete iptables cleanup can be achieved running the following commands:
1
2
3
4
5
6
7
8
# iptables -F
# iptables -X
# iptables -t nat -F
# iptables -t nat -X
# iptables -t mangle -F
# iptables -t mangle -X
# iptables -t raw -F
# iptables -t raw -X
After that cleanup, if you list current rules (iptables -L), surely you will see the default iptables setup.
Adding rules
Now let’s get to the most interesting part: let’s add our first rule to iptables. As an example, let’s add a rule to block access to the machine itself (127.0.0.1 or localhost).
Before that, ping the machine itself and make sure it works (use Ctrl + C to interrupt it):
1
2
3
4
5
6
7
8
$ ping 127.0.0.1
PING 127.0.0.1 (127.0.0.1) 56(84) bytes of data.
64 bytes from 127.0.0.1: icmp_seq=1 ttl=64 time=0.036 ms
64 bytes from 127.0.0.1: icmp_seq=2 ttl=64 time=0.106 ms
^C
--- 127.0.0.1 ping statistics ---
2 packets transmitted, 2 received, 0% packet loss, time 1010ms
rtt min/avg/max/mdev = 0.036/0.071/0.106/0.035 ms
Then add the rule:
1
# iptables -A INPUT -d 127.0.0.1 -j DROP
Let’s examine what each part of this command does:
- the
filtertable is being considered, as we aren’t specifying a table (as with previous commands, we could use the-tparameter to specify a table) - the
-Aparameter tells iptables to append the rule to the end of the selected chain INPUTis the chain where the rule is being added — in this case, we are interested in the packets arriving at the machine- the
-dparameter (it could also be written--dstor--destination) specifies the destination — in this case, we want to filter packets destined for127.0.0.1(the machine itself) - the
-jparameter (or--jump) indicates what to do with a packet that matches the rule (the target) — in this case, discard (DROP)
Now, after adding the rule, try pinging again:
1
2
3
4
5
$ ping 127.0.0.1
PING 127.0.0.1 (127.0.0.1) 56(84) bytes of data.
^C
--- 127.0.0.1 ping statistics ---
2 packets transmitted, 0 received, 100% packet loss, time 1006ms
Did you see? It didn’t work. iptables is blocking these packets based on the rule we just added.
Note: the above rule has been used for didatic purposes only. Never block access to the machine itself, unless you know what you are doing, because many applications use TCP sockets to make connections.
That said, let’s undo the addition of the above rule before continuing:
1
# iptables -F
Setting the default policy for a chain
Between flushing tables and adding rules, I usually set the default policy for the chains. Using the iptables -L command, we saw that the default iptables setting is to allow all traffic in all chains (default policy of ACCEPT).
Usually, when we adopt a permissive default policy (ACCEPT) for a chain, we add restrictive rules (DROP or REJECT) to that chain, i.e. rules determine what to block and everything else is allowed.
Conversely, when we adopt a restrictive default policy (DROP) for a chain, we add permissive rules (ACCEPT) to that chain, i.e. rules determine what to allow and everything else is blocked.
For most chains, a permissive default policy (ACCEPT) is considered insecure. At least for the INPUT chain, consider using a restrictive default policy (DROP). Thus, you only need to allow services that are considered secure and don’t risk forgetting to block any unwanted accesses.
To set the default policy for a chain, use the iptables -P command followed by the chain name and the target you would like to be the default policy. Examples:
1
2
3
# iptables -P FORWARD DROP
# iptables -P INPUT DROP
# iptables -P OUTPUT ACCEPT
If you run the three commands above, something may stop working, e.g. your browser becomes unable to access websites. That happens because network traffic generally needs to be two-way — outgoing and incoming, request and response — to work properly. In this case, although the request is sent (the default policy for the OUTPUT chain is ACCEPT), the response is dropped (default policy for INPUT is DROP). To prevent such cases, I usually add the following rule:
1
# iptables -A INPUT -m state --state ESTABLISHED,RELATED -j ACCEPT
This is a “ready recipe” I found on the Internet to accept connections that have already been established. This rule tells iptables to allow responses to requests initiated by the machine itself.
Note that default policies are set for built-in (non-user-defined) chains only.
Describing packets
Let’s take a look at some parameters we can use to describe packets when writing rules, as well as examples of valid rules.
Note: following rules are just examples, you shouldn’t simply copy and paste them to your server or desktop, adapt them according to your needs.
-
destination: we’ve already seen the
-d(or--dst, or--destination) parameter, which lets you filter a packet by its destination, which can be:
1
# iptables -A OUTPUT -d 157.240.12.35 -j REJECT
(it reads: all packets leaving this machine destined for 157.240.12.35 must be rejected — it’s one of the IP addresses assigned to www.facebook.com, but note that blocking access to Facebook is actually not that simple, this rule is just an example)
Warning: even though you can use names to write rules, that is a really bad idea, prefer to use IP addresses (imagine what can happen if your DNS server goes down — or worse, if it gets hacked).
- source: similarly, the
-s(or--src, or--source) parameter lets you filter a packet by its source, which can be described the same way as the destination.
1
# iptables -A INPUT -s 222.187.224.200 -j DROP
(all packets trying to enter this machine coming from 222.187.224.200 must be discarded — once, this IP address was trying to attack a server I was administering, I don’t know if this address is still used for attacks)
- source interface: the
-i(or--in-interface) parameter lets you filter a packet by the network interface via which it was received (e.g.eth0).
1
# iptables -A INPUT -i lo -j ACCEPT
(all packets received on the loopback interface — lo — must be allowed)
- destination interface: similarly, the
-o(or--out-interface) parameter lets you filter a packet by the network interface via which it is going to be sent.
1
# iptables -A FORWARD -i eth0 -o eth1 -j DROP
(discard all packets that try to pass from the eth0 interface to the eth1 interface)
- protocol: the
-p(or--protocol) parameter lets you filter a packet by its protocol, which can be one of TCP, UDP or ICMP, written in uppercase or lowercase.
1
# iptables -A INPUT -p icmp -j ACCEPT
(allow all ICMP packets — e.g. ping)
-
source port: the
--sport(or--source-port) parameter lets you filter a packet by its source port, this parameter can only be used in conjunction with-p tcpor-p udp. -
destination port: the
--dport(or--destination-port) parameter lets you filter a packet by its destination port, this parameter can only be used in conjunction with-p tcpor-p udp.
1
2
# iptables -A INPUT -p tcp --dport 22 -i eth0 -j ACCEPT
# iptables -A INPUT -p udp --dport 22 -i eth0 -j ACCEPT
(allow all incoming TCP and UDP packets received on the eth0 interface destined for port 22 — which is the default port of the SSH service)
Note: all of the above parameters can be negated by usign an exclamation sign (!) before.
1
2
# iptables -A INPUT -p tcp --dport 22 ! -i eth0 -j DROP
# iptables -A INPUT -p udp --dport 22 ! -i eth0 -j DROP
(discard all incoming TCP and UDP packets destined for port 22 received on an interface other than eth0)
Knowing these parameters, you are already able to write many rules, but iptables provides even more options. For the complete list, refer to the iptables man page:
1
$ man iptables
Or, if you prefer to read it using your web browser:
The following port list may also be useful when writing rules:
What is the difference between DROP and REJECT?
At this point you may be wondering this.
The DROP and REJECT targets are similar in that both block the packet (both don’t let the packet through). But the DROP target silently discards the packet, the sender does not get a response and “feels” ignored, while the REJECT target responds to the connection request with a “connection refused” error message.
You can see the difference between DROP and REJECT outlined in the figure at the beginning of the post.
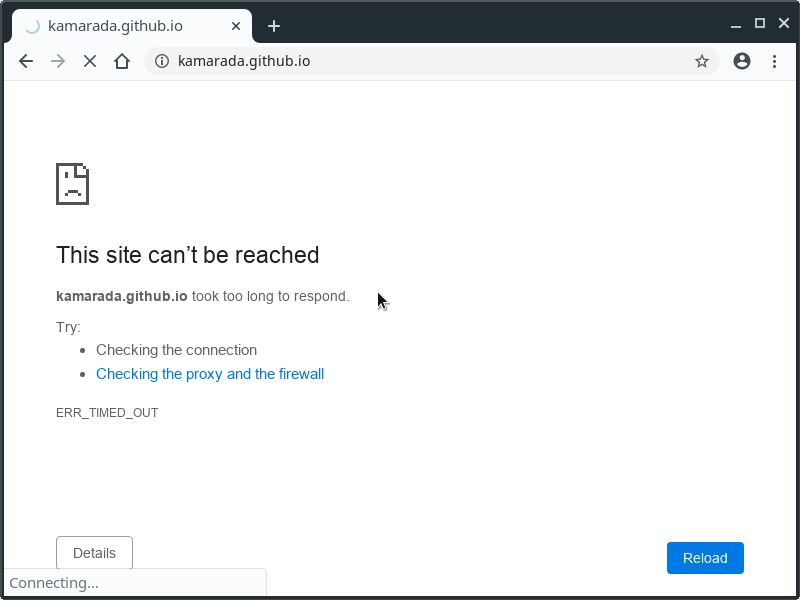
Let’s test that difference. Add the following rule using the DROP target:
1
# iptables -A OUTPUT -d kamarada.github.io -j DROP
Now try to access kamarada.github.io using your favorite web browser (I suggest you open that link in a new tab). After a long time trying to connect, the browser reports that the site couldn’t be reached because it took too long to respond:
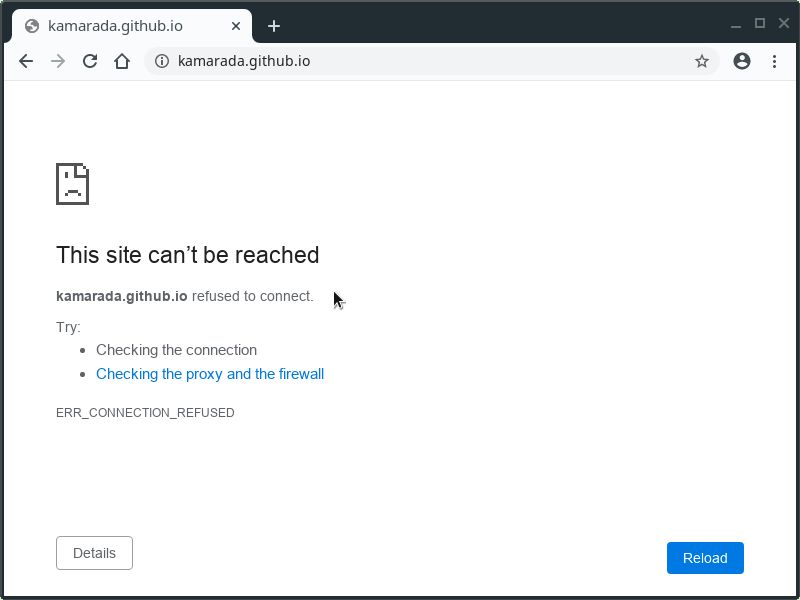
Delete that rule (to delete only a specific rule, you can repeat it by changing -A to -D) and add another rule, this time using the REJECT target:
1
2
# iptables -D OUTPUT -d kamarada.github.io -j DROP
# iptables -A OUTPUT -d kamarada.github.io -j REJECT
Now refresh that tab. The browser immediately reports that the connection was refused:
Depending on your intention, it may be more interesting to use one or the other target. For instance, I would use REJECT to block websites from an office network, because a more emphatic message would be displayed for the users, but to block unwanted types of access from the outside world I would use DROP, because an eventual attacker would not receive a response and would feel like “shooting in the dark”.
Saving and restoring rules
Rules are stored in the kernel and start to be applied as soon as iptables commands are executed, but they are ephemeral, i.e. they are lost if the system is rebooted.
Two tools that you can use to save and restore rules are iptables-save and iptables-restore, respectively.
To save the rules currently in use, run:
1
# iptables-save > /path/to/file
To restore rules from a previously created file, run:
1
# iptables-restore < /path/to/file
Configuring iptables with shell script
Although iptables-save and iptables-restore are convenient, the most common way to set up iptables (erase rules, set default policies, add rules) is to write a shell script. It is more readable and easier to document and maintain.
For example, create a script named my-firewall.sh in the /usr/local/sbin/ folder using your favorite text editor (I’m going to use nano):
1
# nano /usr/local/sbin/my-firewall.sh
Copy and paste the following content (hint: to paste into the terminal, use Ctrl + Shift + V):
1
2
3
4
5
6
7
8
9
10
11
12
13
14
15
16
17
18
19
20
21
22
23
24
25
26
27
28
29
30
31
32
33
#!/bin/bash
set -ex

# Cleanup
iptables -F
iptables -X
iptables -t nat -F
iptables -t nat -X
iptables -t mangle -F
iptables -t mangle -X
iptables -t raw -F
iptables -t raw -X

# Default policy: block all incoming connections
iptables -P FORWARD DROP
iptables -P INPUT DROP
iptables -P OUTPUT ACCEPT

# Allow previously established connections
iptables -A INPUT -m state --state ESTABLISHED,RELATED -j ACCEPT

# Allow loopback connections
iptables -A INPUT -i lo -j ACCEPT

# ICMP (ping)
iptables -A INPUT -p icmp -j ACCEPT

# SSH (port 22/TCP,UDP)
iptables -A INPUT -p tcp --dport 22 -j ACCEPT
iptables -A INPUT -p udp --dport 22 -j ACCEPT

# HTTP (port 80/TCP)
iptables -A INPUT -p tcp --dport 80 -j ACCEPT
This script is a very simple template designed for a web server. Remember to adapt it to your needs.
Change the file permissions so that only the root user is allowed to run the script:
1
# chmod 744 /usr/local/sbin/my-firewall.sh
That’s it! Now, when you need to set up iptables, just run the script:
1
# /usr/local/sbin/my-firewall.sh
When you need to change the firewall rules, edit the script and run it again.
Starting iptables at boot
For our firewall to be perfect, just one thing is missing: rules must be set up at boot time, together with the operating system, networking and services.
On systemd distributions, such as openSUSE and Linux Kamarada, the best way to run a script such as my-firewall.sh at boot time is to create a service.
For example, create a systemd service called my-firewall.service in the /etc/systemd/system/ folder using your favorite text editor:
1
# nano /etc/systemd/system/my-firewall.service
Copy and paste the following content:
1
2
3
4
5
6
7
8
[Unit]
After=network.target

[Service]
ExecStart=/usr/local/sbin/my-firewall.sh

[Install]
WantedBy=default.target
Adjust the file permissions:
1
# chmod 664 /etc/systemd/system/my-firewall.service
Install and enable the service so that it starts at next boot:
1
2
# systemctl daemon-reload
# systemctl enable my-firewall
If you want to test your service before rebooting, run:
1
2
# systemctl start my-firewall
# iptables -L
That’s it! The next time you reboot your system, systemd will start the service that runs the script that configures iptables.
References
I hope this text was helpful. If you have read it all, now you have enough knowledge to deploy iptables on your servers. If you want to know more, you can read these:
- Firewall (computing) - Wikipedia
- iptables(8) - Linux man page
- Iptables Essentials: Common Firewall Rules and Commands - DigitalOcean
- Control Network Traffic with iptables - Linode
- Basic iptables Tutorial - SUSE Communities
- Linux Iptables block incoming access to selected or specific ip address - nixCraft
- How to automatically execute shell script at startup boot on systemd Linux - LinuxConfig.org


