Now that you are familiar with KIWI, you can build Linux Kamarada on your own computer, if you want. There is an ISO image you can download from the Download page. Its source code is available on GitLab, in the Linux-Kamarada-GNOME repository. Below, you are going to see how to download the source code using Git and how to build the ISO image on your computer using KIWI.
If you are not familiar with KIWI yet, I recommend you read the previous posts:
- KIWI: the openSUSE tool for creating Linux system images
- KIWI: creating an openSUSE Leap live image with GNOME desktop
If you followed the KIWI tutorial, you probably have Git installed on your computer already. If you don’t, install the git package:
1
# zypper in git
Then, get the Linux Kamarada source code:
1
$ git clone https://gitlab.com/kamarada/Linux-Kamarada-GNOME.git
Git creates the Linux-Kamarada-GNOME folder with the Linux Kamarada source code. Enter this folder:
1
$ cd Linux-Kamarada-GNOME
I create a branch for each version (15.6, 15.5, 15.4, etc) as well as development branches (15.6-dev, 15.5-dev, 15.4-dev, etc).
Switch to the desired branch:
1
$ git checkout 15.6-dev
Here, I’m going to use the 15.6-dev branch, which is the branch I’m currently working on. Since it’s a development branch, it may contain changes that aren’t yet found in the publicly downloadable image.
Open the appliance.kiwi file and comment out (or remove) the configuration to use the OBS repositories. Also uncomment the other repositories. In the end, the repository configuration should look like this:
1
2
3
4
5
6
7
8
9
10
11
12
13
14
15
    <repository alias="kamarada" imageinclude="true" priority="1" type="rpm-md">
        <source path="obs://home:kamarada:15.6:dev/openSUSE_Leap_15.6"/>
    </repository>
    <repository alias="kiwi-next-generation" priority="2" type="rpm-md">
        <source path="obs://Virtualization:Appliances:Builder/openSUSE_Leap_15.6"/>
    </repository>
    <repository alias="repo-update" imageinclude="true" priority="3" type="rpm-md">
        <source path="obs://openSUSE:Leap:15.6:Update/standard"/>
    </repository>
    <repository alias="repo-oss" imageinclude="true" priority="4" type="rpm-md">
        <source path="obs://openSUSE:Leap:15.6/standard"/>
    </repository>
    <!--<repository type="rpm-md">
        <source path="obsrepositories:/"/>
    </repository>-->
I made a build script to make everything easier. Run it:
1
$ sh build.sh
You can inspect its source code, but here is a summary of what it does:
- Check if it is being run with administrator (root user) privileges, otherwise it invokes itself with sudo;
- Use a folder called
tmp-kamaradain the user’s home folder to prepare and create the image (in the KIWI tutorial, we used/tmp/myimage/); - Remove this folder, if it already exists, before invoking KIWI (in the tutorial, this was something we did manually);
- Invoke KIWI to prepare and create the ISO image (kiwi system build);
- Invoke KIWI to create a result bundle with the built image (kiwi result bundle command) – in practice, what this command does here is calculate the SHA-256 checksum of the image;
- Adjust the permissions of the files generated by KIWI (after all, it was run as root); and
- Delete the folder used to prepare the image system.
Feel free to copy it and use it in your KIWI projects. After all, it is free software!
When the script finishes (that may take a while), you will see the files generated by KIWI in the Linux-Kamarada-GNOME folder:
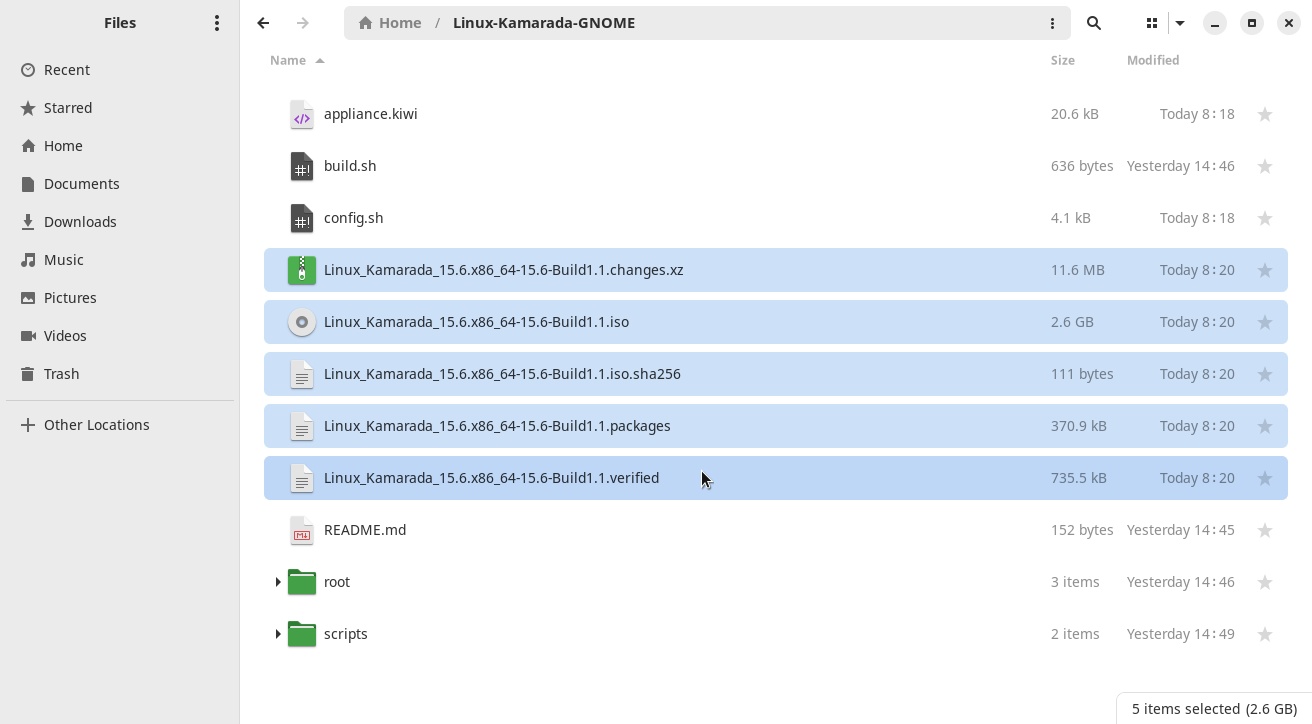
Of these, the most important is the ISO image, but I usually save the SHA-256 checksum and the .packages file as well (see on SourceForge).
Note that if you do a git status, these files do not appear in the list to be added to version control. That is because I added them to .gitignore.
Whatever you’re trying to do (learning KIWI, using Linux Kamarada as a starting point to create your own Linux distro, simply building Linux Kamarada out of curiosity, or something else – tell me in the comments), I hope this article has helped you. If you have any questions, you can ask in the comments.
See you next time!
In this tutorial, you commented the configuration to use OBS repositories in order to be able to build Linux Kamarada locally on your own computer. But this configuration is there because Linux Kamarada is usually built remotely on OBS.
If you want to know exactly how Linux Kamarada is built, and how you can do the same, check out this tutorial:


