Commonly, restricted access systems authenticate their users by requesting a combination of username (a.k.a login) and password.
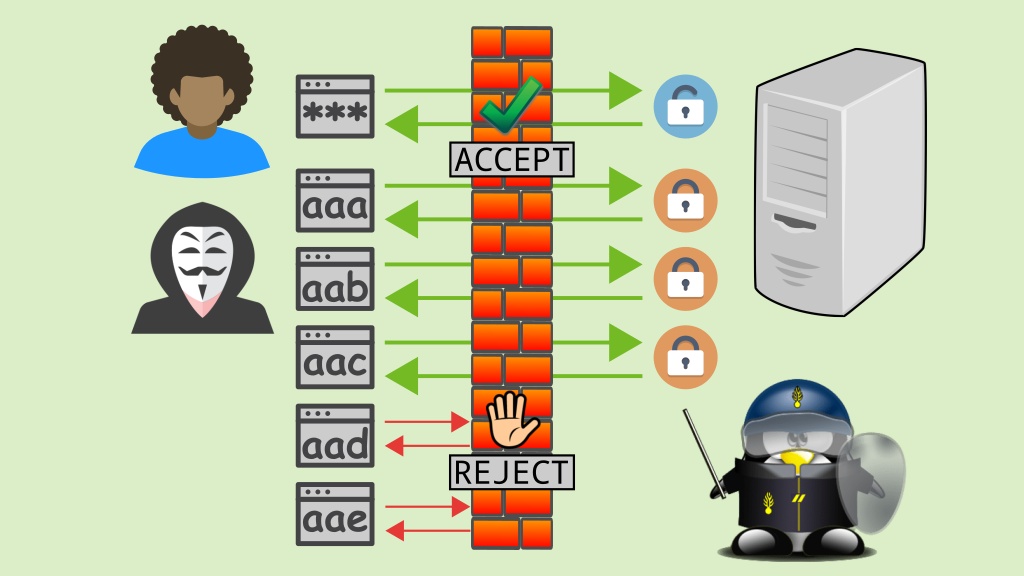
A brute-force attack is a type of attack that consists in trying to guess a combination of username and password that grants access to a system. If an attacker knows at least an existing username, they are already halfway, because then they only need to find out the corresponding password. This is usually done on a trial and error basis, testing all possible passwords (e.g. aaaa, aaab, aaac … 1234, 1235, etc).
It’s one of the simplest and oldest attack methods, but it’s still used and, believe it or not, effective, as many people use short, weak, easy to guess or even obvious passwords. Depending on the length and complexity of a password, a brute-force attack can take anywhere from a few seconds to many years to discover it.
Linux sysadmins need to protect servers against attacks and illegitimate access. We’ve already talked about the iptables firewall, which acts on the layers 2 and 3 (network and transport) of the TCP/IP model. It can stop brute-force attacks, which occur at the layer 4 (application), with the help of a tool called fail2ban.
What is fail2ban?
fail2ban is an intrusion prevention system (IPS) in the form of a daemon that monitors login attempts to system services and takes immediate action when it detects an IP address that behaves suspiciously — too many password failures, seeking for exploits, etc.
fail2ban works by continuously scanning system logs (such as /var/log/messages, /var/log/apache2/access_log, /var/log/apache2/error_log, etc.) looking for failed login attempts. It’s able to monitor various network services out-of-the-box, such as SSH, Apache, FTP, SMTP, MySQL, etc. Usually the action taken by fail2ban against an offending host is to add a rule to iptables to reject its IP address for a specified amount of time, although any other arbitrary action can also be configured (e.g. sending an email to the sysadmin).
Note that fail2ban reduces the rate of incorrect authentication attempts, however it cannot eliminate the inherent risk of weak authentication methods (for instance, if a user’s password is 123456, and an attacker starts a brute-force attack by testing just that password, access to the system will be granted right on the first try). To increase the security of services, configure them to use more secure authentication mechanisms, such as two-factor authentication or public-key authentication.
Installing fail2ban
Repeating the recommendation I gave on the iptables tutorial, to follow this tutorial, I recommend that you use a virtual machine. Doing that, you don’t need to modify your server or desktop settings until you are familiar with fail2ban.
For more information, read:
To install fail2ban on openSUSE and based distributions (such as Linux Kamarada), run the following command:
1
# zypper in fail2ban
Configuring fail2ban
By default, fail2ban keeps its configuration files in the /etc/fail2ban/ folder:
1
2
3
4
5
6
7
8
9
10
11
12
13
14
# cd /etc/fail2ban
# ls -lah
total 40K
drwxr-xr-x 6 root root  220 Jan  5 13:29 .
drwxr-xr-x 1 root root  780 Jan  5 13:29 ..
drwxr-xr-x 2 root root 1.3K Jan  5 13:29 action.d
-rw-r--r-- 1 root root 2.3K Oct  4  2018 fail2ban.conf
drwxr-xr-x 2 root root   40 Mar 27  2019 fail2ban.d
drwxr-xr-x 3 root root 1.7K Jan  5 13:29 filter.d
-rw-r--r-- 1 root root  23K Mar 27  2019 jail.conf
drwxr-xr-x 2 root root   40 Mar 27  2019 jail.d
-rw-r--r-- 1 root root   71 Mar 27  2019 jail.local
-rw-r--r-- 1 root root 2.8K Mar 27  2019 paths-common.conf
-rw-r--r-- 1 root root  975 Mar 27  2019 paths-opensuse.conf
The main configuration files are fail2ban.conf and jail.conf. It’s not recommended to directly edit them, because they belong to the fail2ban RPM package and may be overwritten during system updates, causing changes to be lost. Instead of editing them, create copies named fail2ban.local and jail.local:
1
2
# cp fail2ban.conf fail2ban.local
# cp jail.conf jail.local
fail2ban first reads .conf files, then .local files, with later settings overriding earlier ones. Thus, a .local file doesn’t have to include everything in the corresponding .conf file, only those settings that you wish to override. An alternative to copying would be creating new text files named fail2ban.local and jail.local and adding to them only settings that should differ from the defaults.
Those files are self-documented and detailed information should be available on them.
Next, we are going to see the main fail2ban settings.
General settings (fail2ban.local)
The fail2ban.conf file (and its corresponding fail2ban.local) contains general fail2ban settings, such as the logging level and target.
Let’s take a look at the most relevant excerpts from this file:
1
2
3
4
5
6
7
8
9
10
11
12
13
[Definition]

# Option: loglevel
# Notes.: Set the log level output.
#         CRITICAL
#         ERROR
#         WARNING
#         NOTICE
#         INFO
#         DEBUG
# Values: [ LEVEL ]  Default: ERROR
#
loglevel = INFO
The loglevel option sets the logging verbosity level. By default, the level is INFO , meaning fail2ban logs simple information as well as errors and more critical messages. It already provides a good level of detail.
1
2
3
4
5
6
7
8
9
10
# Option: logtarget
# Notes.: Set the log target. This could be a file, SYSLOG, STDERR or STDOUT.
#         Only one log target can be specified.
#         If you change logtarget from the default value and you are
#         using logrotate -- also adjust or disable rotation in the
#         corresponding configuration file
#         (e.g. /etc/logrotate.d/fail2ban on Debian systems)
# Values: [ STDOUT | STDERR | SYSLOG | SYSOUT | FILE ]  Default: STDERR
#
logtarget = /var/log/fail2ban.log
The logtarget option sets where the log should be written. By default, fail2ban logs to the /var/log/fail2ban.log file. You can refer to this file when you need to check if everything is working well.
Normally, you don’t need to change the file fail2ban.conf (or fail2ban.local).
General jail settings (jail.local)
The jail.conf file (and its corresponding jail.local) is probably the most important file. It contains the declaration and configuration of the jails, which correspond to the services monitored by fail2ban. By default, all jails are disabled. You need to enable the ones you need and adapt their settings to your server configuration.
The jail.local file has sections. Each jail has its own section. At the beginning of the file, before the sections of the jails, there is a [DEFAULT] section. Settings in this section apply to all jails. Specific settings can be overridden by specific jails afterwards, if necessary.
Let’s take a look at the most relevant excerpts from the [DEFAULT] section:
1
2
3
4
5
6
7
8
9
10
11
# The DEFAULT allows a global definition of the options. They can be overridden
# in each jail afterwards.

[DEFAULT]

...

# "ignoreip" can be a list of IP addresses, CIDR masks or DNS hosts. Fail2ban
# will not ban a host which matches an address in this list. Several addresses
# can be defined using space (and/or comma) separator.
#ignoreip = 127.0.0.1/8 ::1
The ignoreip option allows us to define exceptions to the fail2ban monitoring. The value of this option is a list that can contain any of the following:
- a host IP address (e.g.
127.0.0.1); - a network/subnet IP address followed by the network mask in CIDR notation (e.g.
192.168.0.1/24); - a hostname (e.g.
www); or - a fully qualified domain name (FQDN, e.g.
kamarada.github.io).
Exceptions must be separated by space and/or comma. fail2ban will not take action against a host that matches an address in this list.
1
2
3
4
5
6
7
8
9
# "bantime" is the number of seconds that a host is banned.
bantime  = 10m

# A host is banned if it has generated "maxretry" during the last "findtime"
# seconds.
findtime  = 10m

# "maxretry" is the number of failures before a host get banned.
maxretry = 5
In my humble opinion, these options would make more sense listed in reverse. Let’s see.
The maxretry option sets how many login attempts can fail before fail2ban takes action against the host trying to log in.
The findtime option sets how often the failed login count gets reset.
The bantime option sets how long a offending host is banned.
We can read the default settings like this: one who misses their password 5 times (maxretry) during the last 10 minutes (findtime) will have their host locked for 10 minutes (bantime), that is, from the last failed login attempt, they will have to wait 10 minutes to be able to try again.
It looks like the default values for those options are great, but you can change them as you need.
1
2
3
4
5
6
7
8
9
10
11
12
13
14
15
16
17
#
# ACTIONS
#

# Some options used for actions

# Destination email address used solely for the interpolations in
# jail.{conf,local,d/*} configuration files.
destemail = root@localhost

# Sender email address used solely for some actions
sender = root@<fq-hostname>

# E-mail action. Since 0.8.1 Fail2Ban uses sendmail MTA for the
# mailing. Change mta configuration parameter to mail if you want to
# revert to conventional 'mail'.
mta = sendmail
The destemail option sets the email address to which fail2ban should send ban notifications for the jails that have email notifications enabled. Similarly, the sender option sets the email address that will be informed as the sender of the email message.
The mta option sets the program that fail2ban will use to send email notifications. By default, Sendmail. Note that email notifications are actually sent only if this program is installed and set up.
1
2
3
4
# Choose default action.  To change, just override value of 'action' with the
# interpolation to the chosen action shortcut (e.g.  action_mw, action_mwl, etc) in jail.local
# globally (section [DEFAULT]) or per specific section
action = %(action_)s
The action option sets the action that fail2ban should take upon identifying suspicious behavior of a host. In the [DEFAULT] section, this option sets the default action for all jails. In the jail.local file, above the action option, some action options are defined (action_, action_mw, action_mwl, etc). The default value is action_, which corresponds to the simplest action to take: ban only. If you have set up email sending, you may want to change the value of this option to action_mw, which corresponds to: ban and notify by email.
Configuring the SSH jail
fail2ban is able to monitor various services. For instance, let’s see how to configure it to monitor SSH login attempts. To do this, let’s go to the [sshd] section of the jail.local file.
1
2
3
4
5
6
7
8
9
[sshd]

# To use more aggressive sshd modes set filter parameter "mode" in jail.local:
# normal (default), ddos, extra or aggressive (combines all).
# See "tests/files/logs/sshd" or "filter.d/sshd.conf" for usage example and details.
#mode   = normal
port    = ssh
logpath = %(sshd_log)s
backend = %(sshd_backend)s
Start by adding enabled = true to enable this jail.
The port option sets the port on which the service listens. If the service listens on the default port (in the case of SSH, port 22), leave the default value, which is the service name (ssh). If the service listens on a port other than the default, enter the port number here.
The logpath option sets the path to the service log file. Similarly, change the value of this option only if the service logs to a file other than the default.
Starting fail2ban
With the initial setup done, it’s time to start fail2ban. To do this, run:
1
# systemctl start fail2ban
Make sure fail2ban is running by checking the service status:
1
2
3
4
5
6
7
8
9
10
11
12
13
14
# systemctl status fail2ban
● fail2ban.service - Fail2Ban Service
   Loaded: loaded (/usr/lib/systemd/system/fail2ban.service; disabled; vendor preset: disabled)
   Active: active (running) since Mon 2020-01-05 15:52:15 EST; 2s ago
     Docs: man:fail2ban(1)
  Process: 8100 ExecStartPre=/bin/mkdir -p /var/run/fail2ban (code=exited, status=0/SUCCESS)
 Main PID: 8101 (fail2ban-server)
    Tasks: 1 (limit: 4915)
   CGroup: /system.slice/fail2ban.service
           └─8101 /usr/bin/python /usr/bin/fail2ban-server -xf start

Jan 05 15:52:15 kamarada-pc systemd[1]: Starting Fail2Ban Service...
Jan 05 15:52:15 kamarada-pc systemd[1]: Started Fail2Ban Service.
Jan 05 15:52:15 kamarada-pc fail2ban-server[8101]: Server ready
Enable the fail2ban service, so that it gets started automatically at boot time:
1
# systemctl enable fail2ban
Testing fail2ban
Let’s see fail2ban acting in practice.
Do not try running the commands in this tutorial on a remote server that you access via SSH: you will risk losing access to the server.
Using a computer different from the one on which you installed fail2ban, try to remotely connect via SSH, but enter a wrong password on purpose a few times:
1
2
3
4
5
6
7
8
9
$ ssh kamarada@10.0.0.250
Password:
Password:
Password:
kamarada@10.0.0.250's password:
Permission denied, please try again.
kamarada@10.0.0.250's password:
Received disconnect from 10.0.0.250 port 22:2: Too many authentication failures
Disconnected from 10.0.0.250 port 22
If you exceed the configured login attempts limit, you will be disconnected from the server.
Note that subsequent login attempts are immediately refused:
1
2
$ ssh kamarada@10.0.0.250
ssh: connect to host 10.0.0.250 port 22: Connection refused
Checking the fail2ban log
As we have seen, by default fail2ban logs to the /var/log/fail2ban.log file.
To open that file, you can use commands such as cat, less or tail:
1
# less /var/log/fail2ban.log
The fail2ban log shows our failed login attempts and the effective banning:
1
2
3
4
5
6
2020-01-05 23:24:01,169 fail2ban.filter         [6803]: INFO    [sshd] Found 10.0.0.10 - 2020-01-05 23:24:00
2020-01-05 23:24:04,638 fail2ban.filter         [6803]: INFO    [sshd] Found 10.0.0.10 - 2020-01-05 23:24:04
2020-01-05 23:24:07,919 fail2ban.filter         [6803]: INFO    [sshd] Found 10.0.0.10 - 2020-01-05 23:24:07
2020-01-05 23:24:12,335 fail2ban.filter         [6803]: INFO    [sshd] Found 10.0.0.10 - 2020-01-05 23:24:12
2020-01-05 23:24:12,361 fail2ban.filter         [6803]: INFO    [sshd] Found 10.0.0.10 - 2020-01-05 23:24:12
2020-01-05 23:24:12,896 fail2ban.actions        [6803]: NOTICE  [sshd] Ban 10.0.0.10
Checking iptables rules
To ban hosts with suspicious behavior, fail2ban adds firewall rules to iptables.
If you list the rules currently in use by iptables, you will see the rule added by fail2ban:
1
2
3
4
5
6
7
8
9
10
11
12
13
14
# iptables -L
Chain INPUT (policy ACCEPT)
target     prot opt source               destination
f2b-sshd   tcp  --  anywhere             anywhere             multiport dports ssh

Chain FORWARD (policy ACCEPT)
target     prot opt source               destination

Chain OUTPUT (policy ACCEPT)
target     prot opt source               destination

Chain f2b-sshd (1 references)
target     prot opt source               destination
RETURN     all  --  anywhere             anywhere
Note that fail2ban creates its own chains to manage its rules.
Unbanning an IP address
It may happen that a legitimate server user has forgotten their password and has been locked out by fail2ban after successive failed login attempts. In this case, you may want to unban the user’s computer so that they can access the server again.
To properly unban a host previously banned by fail2ban, run:
1
# fail2ban-client set JAIL unbanip IP_ADDRESS
For instance:
1
# fail2ban-client set sshd unbanip 10.0.0.10
If you try to remotely access the server via SSH, this time entering the correct password, you will be able to log in.
Stopping fail2ban
If for any reason you need to stop the fail2ban monitoring, run:
1
$ systemctl stop fail2ban
Please note that stopping fail2ban causes the deletion of any rules added to iptables by fail2ban, thus allowing any previously blocked hosts to make new login attempts to the server.
Incrementing the iptables script
On the previous post about iptables, we created a script to start and set up iptables at boot time. Now we can increment that script by stopping fail2ban before clearing the rules and starting it again at the end:
1
2
3
4
5
6
7
8
9
10
11
12
13
14
15
16
17
18
19
20
21
22
23
24
25
26
27
28
29
30
31
32
33
34
35
36
#!/bin/bash
set -ex

# Stop fail2ban
systemctl stop fail2ban

# Cleanup
iptables -F
iptables -X
iptables -t nat -F
iptables -t nat -X
iptables -t mangle -F
iptables -t mangle -X
iptables -t raw -F
iptables -t raw -X

# Default policy: block all incoming connections
iptables -P FORWARD DROP
iptables -P INPUT DROP
iptables -P OUTPUT ACCEPT

# Allow previously established connections
iptables -A INPUT -m state --state ESTABLISHED,RELATED -j ACCEPT

# Allow loopback connections
iptables -A INPUT -i lo -j ACCEPT

# SSH (port 22/TCP,UDP)
iptables -A INPUT -p tcp --dport 22 -j ACCEPT
iptables -A INPUT -p udp --dport 22 -j ACCEPT

# HTTP (port 80/TCP)
iptables -A INPUT -p tcp --dport 80 -j ACCEPT

# Start fail2ban
systemctl start fail2ban
References
I hope this text was helpful. Timely, as we study different types of servers (web server, database server, FTP server, mail server, etc), we will see how we can protect them using the iptables and fail2ban duo.
If you have any questions or helpful information to add, please leave a comment.
See you!
- What’s a Brute Force Attack? - Kaspersky
- How To Protect Server Against Brute Force Attacks With Fail2ban On Linux - 2daygeek.com
- Manual - Fail2ban
- firewall - How to Unban an IP properly with Fail2Ban - Server Fault
- O que é e como funciona um ataque de força bruta - Artigo - Viva o Linux (in Portuguese)
- Proteção utilizando fail2ban contra ataques do tipo - Artigo - Viva o Linux (in Portuguese)
- Fail2ban - Aprendendo a instalar e configurar - Dica - Viva o Linux (in Portuguese)


