We have already seen on a previous post how to install openSUSE Leap on a server. Now, you are going to walk through a checklist with the first things to set up on the new server so that it can be considered effectively ready to use.
 clip)](/files/2017/02/opensuse-server-config-01.jpg)
Let the Geeko take care of your servers! (picture taken from the Uptime Funk clip)
If you landed here without passing by the previous post on how to install openSUSE on a server, I recommend you to start your reading by that post (unless you already have openSUSE on your server).
Resuming…
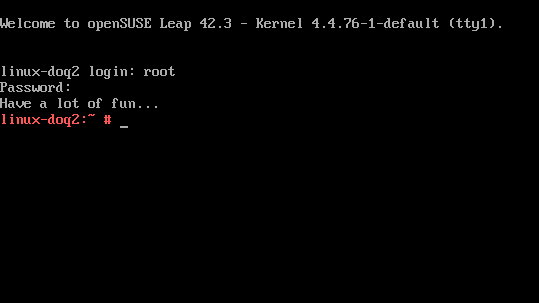
We finished that post at the login screen, right after the server rebooted.
Log in as root. To do that, type root and press Enter, then enter the root password you set up during installation and press Enter again (nothing will appear on screen as you type the root password, this is intended):
By the time I wrote the first part of this tutorial 42.2 was the latest openSUSE Leap release. We are now at 42.3, which is the release I use on this second part. The whole procedure haven’t changed between 42.x releases. If you followed the first part and now you have a 42.2 server, you can safely follow.
Also note that the next release openSUSE Leap 15.0 is already on the way. If the change from the current version number of 42.x to 15.x sounds confusing, you can find more information about that change on the openSUSE mailing list archive.
YaST Control Center
One of the reasons I recommend openSUSE to anyone who looks for a Linux distribution is YaST, the configuration tool for openSUSE. YaST stands for Yet another Setup Tool. It can be used to configure the entire system, including hardware, software, networking, system services, users and groups, security, date and time, languages and many other settings.
YaST provides an attractive interface even on the command line. Start it by running:
1
# yast
If you are not used to that notation, it means type yast and hit Enter. The hash sign (#) is not part of the command and should not be typed. It only indicates the command needs elevated privileges to be run (i.e. it needs to be run by the root user). Soon you are going to see commands that can be run by any user (both elevated and ordinary users), these are indicated by the dollar sign ($).
That done, YaST’s main screen is shown:
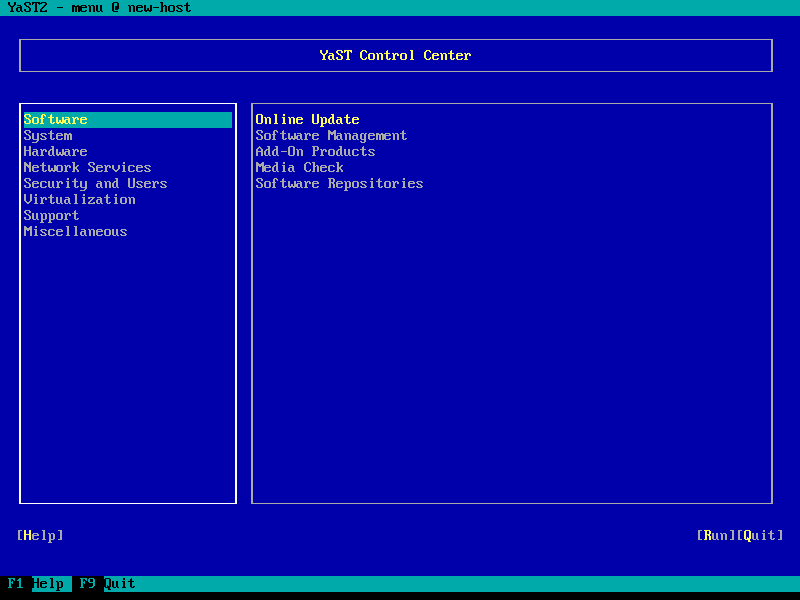
Settings are listed by the right, grouped by categories listed by the left.
If you already use openSUSE on your desktop, maybe you already know YaST:
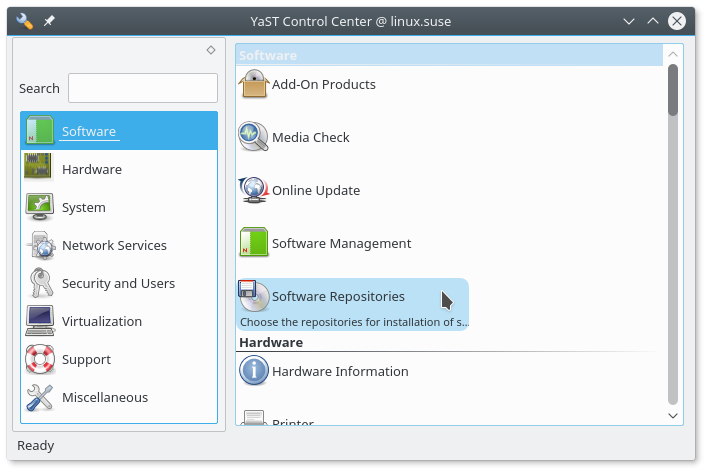
YaST's graphical user interface
Actually, you already know YaST from the previous post: besides being an openSUSE configuration tool, YaST is also the openSUSE installer itself (you can revisit that post and see that the name “YaST” appears on the upper-left corner of all screens).
Who is used to Windows may think YaST resembles Control Panel. Indeed, both are configuration tools for their respective systems.
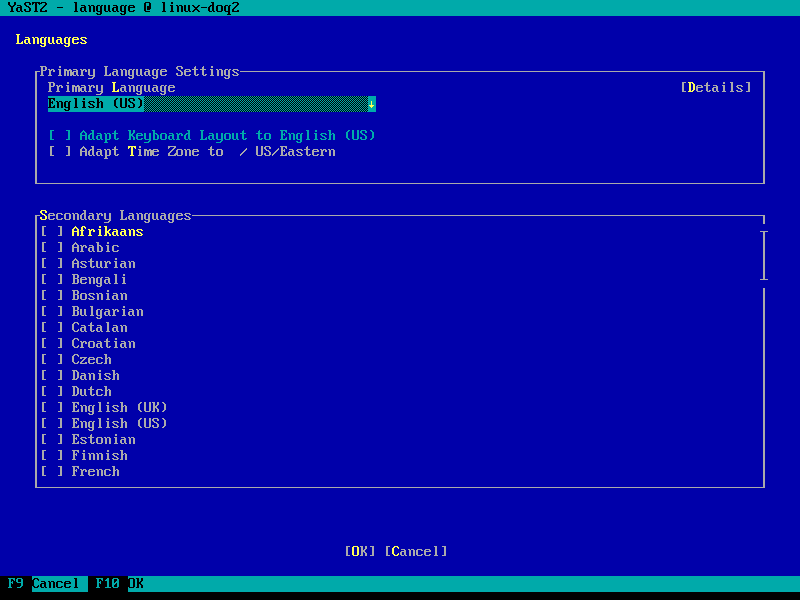
Language settings
This post presents openSUSE in English and assumes you are going to use it that way. But you may want to translate it to your language.
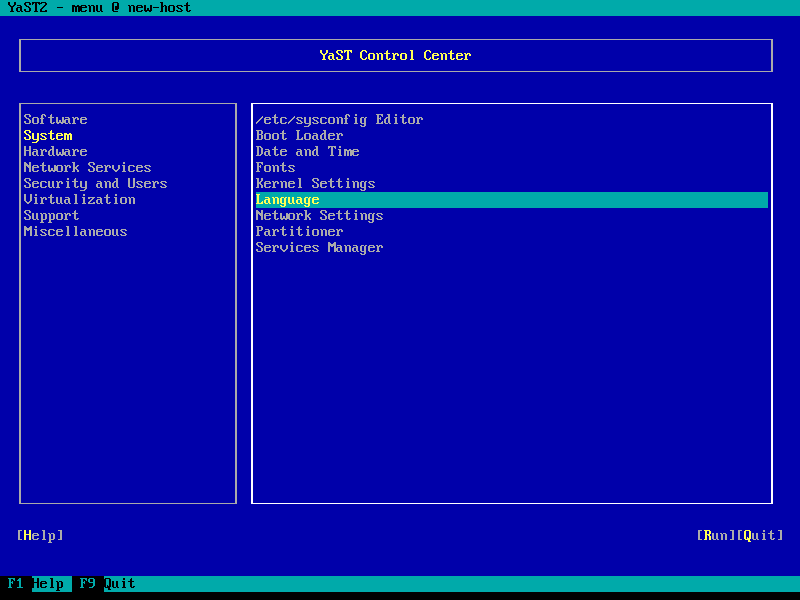
If that is the case, select the System category by the left and the Language setting by the right:
Set the Primary Language as desired:
Then choose Details.
On the Language Details dialog, change Locale Settings for User root from ctype Only to Yes:

That is needed because by default interfaces are translated only for ordinary users, while the root user interfaces are kept in English. That change makes interfaces be translated for the root user as well.
Language settings for the root user are applied only on the next login. So, choose OK and OK again. You will be back to the YaST main screen. Choose Quit and you will be back to the command line interface. To log out, run:
1
$ exit
Then, log in as root and start YaST:
1
# yast
Note that now YaST is translated into the language you selected.
Basic network settings
We simplified installation by using DHCP to automatically set up networking. But servers usually have their networking manually set up. So let’s roll up our sleeves.
Note: it is beyond the scope of this post to explain basic networking concepts. Just in case you need, the official openSUSE documentation is rich in information for both beginner and experienced network administrators.
By the left select System and by the right choose Network Settings. YaST spends some time verifying current network settings and lists network interfaces:
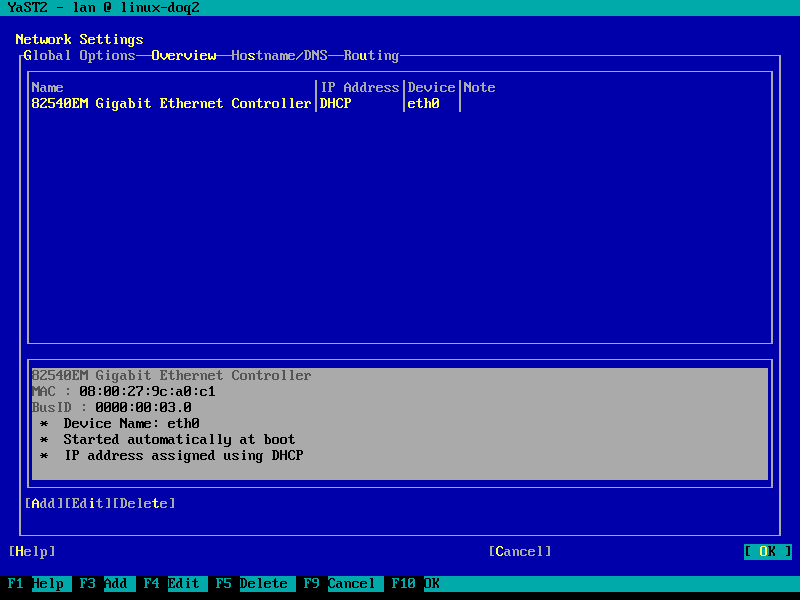
On that list, select the network interface and choose Edit.
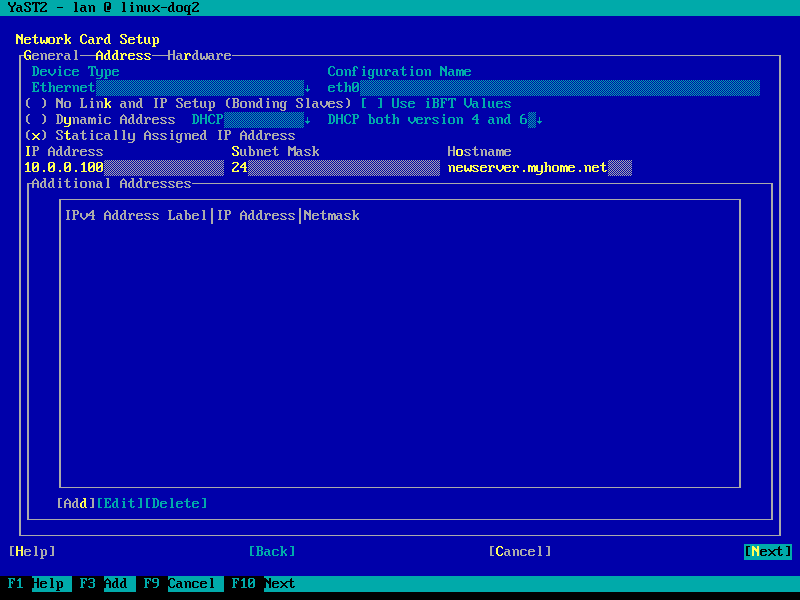
On the Network Card Setup screen, choose Statically Assigned IP Address and enter:
- the IP Address (for instance,
10.0.0.100, note that is a private network address, following the standards set by RFC 1918), - the Subnet Mask (
255.255.255.0or/24or simply24, YaST is smart enough to understand both traditional and CIDR subnet mask notations), and - the Hostname along with the domain name, that is the fully qualified domain name (
newserver.myhome.net).
When you are ready, choose Next:
Back to the Network Settings screen, switch to the Hostname/DNS tab, enter the Hostname (newserver), the Domain Name (myhome.net) and the name servers IP addresses (not their host names):
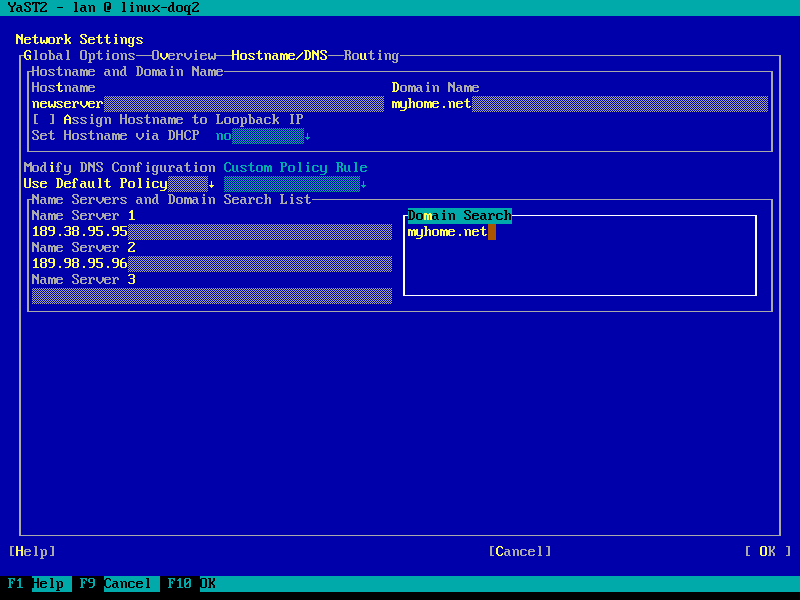
If your network has local name servers, you should prefer them. If not, ask your Internet Service Provider (ISP) which ones to use. Alternatively, you may use a tool such as DNS Benchmark to compare the performance of many well known publicly available name servers and pick the best ones. For instance, I used Brazilian name servers from GigaDNS: 189.38.95.95 e 189.38.95.96. Many people use Google Public DNS servers: 8.8.8.8 e 8.8.4.4.
Fill in the Domain Search list with domain names used for resolving host names without a specified domain. You should use at least your server domain (myhome.net). If you want to inform more than one domain, separate domains with commas or white space.
Question: when is that useful? Suppose your network has a server www.myhome.net. If you are on newserver and run:
1
$ ping www
That command is going to produce the same result as this one:
1
$ ping www.myhome.net
The ping command is used to verify that a computer can communicate with another on a network. It sends a small packet to the destination computer, which responds immediately. If everything goes as expected, a message is presented on screen, indicating there is communication.
On the above examples, the ping command would try to reach the same server.
Back to the Network Settings screen, switch to the Routing tab.
Enter the Default IPv4 Gateway address:
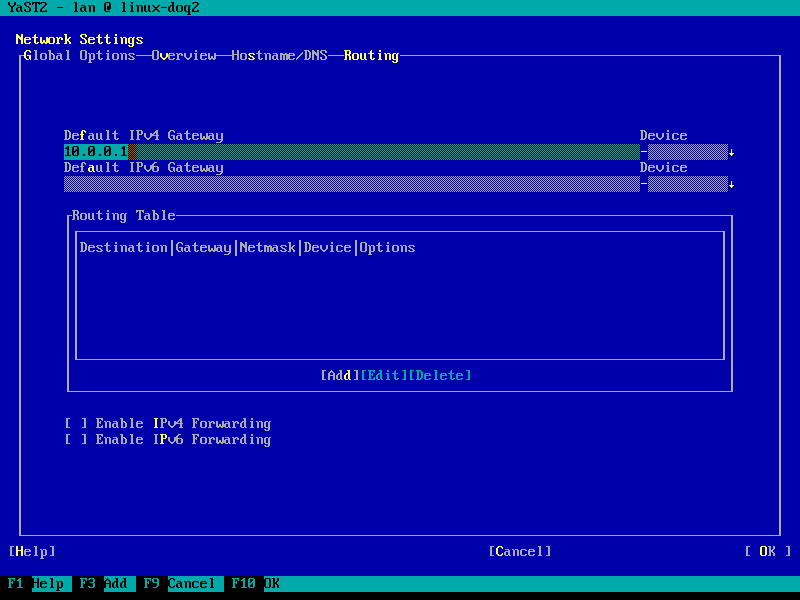
If your new server is going to act as a firewall and/or router, also check the option Enable IPv4 Forwarding. You may need to fill (now or later) the Routing Table.
When you are ready, choose OK.
Network settings are applied and YaST takes us back to its main screen.
Choose Quit. Let’s do some basic networking tests using the ping command. Run:
ping 10.0.0.5(a computer on the same network as your server),ping 8.8.8.8(a computer on an external network, it can be a server on the Internet, for instance a Google Public DNS server) andping www.google.com(a name to test DNS).
1
2
3
4
5
6
7
8
9
10
11
12
13
14
15
16
17
18
19
20
21
22
23
24
25
26
27
28
29
30
31
32
33
34
35
$ ping 10.0.0.5

PING 10.0.0.5 (10.0.0.5) 56(84) bytes of data.
64 bytes from 10.0.0.5: icmp_seq=1 ttl=64 time=0.259 ms
64 bytes from 10.0.0.5: icmp_seq=2 ttl=64 time=0.189 ms
64 bytes from 10.0.0.5: icmp_seq=3 ttl=64 time=0.189 ms
64 bytes from 10.0.0.5: icmp_seq=4 ttl=64 time=0.186 ms
^C
--- 10.0.0.5 ping statistics ---
4 packets transmitted, 4 received, 0% packet loss, time 2999ms
rtt min/avg/max/mdev = 0.186/0.205/0.259/0.035 ms

$ ping 8.8.8.8

PING 8.8.8.8 (8.8.8.8) 56(84) bytes of data.
64 bytes from 8.8.8.8: icmp_seq=1 ttl=48 time=137 ms
64 bytes from 8.8.8.8: icmp_seq=2 ttl=48 time=77.0 ms
64 bytes from 8.8.8.8: icmp_seq=3 ttl=48 time=77.5 ms
64 bytes from 8.8.8.8: icmp_seq=4 ttl=48 time=76.6 ms
^C
--- 8.8.8.8 ping statistics ---
4 packets transmitted, 4 received, 0% packet loss, time 3001ms
rtt min/avg/max/mdev = 76.684/92.244/137.753/26.278 ms

$ ping www.google.com

PING www.google.com (172.217.29.228) 56(84) bytes of data.
64 bytes from gru06s28-in-f228.1e100.net (172.217.29.228): icmp_seq=1 ttl=56 time=28.1 ms
64 bytes from gru06s28-in-f228.1e100.net (172.217.29.228): icmp_seq=2 ttl=56 time=32.1 ms
64 bytes from gru06s28-in-f228.1e100.net (172.217.29.228): icmp_seq=3 ttl=56 time=28.4 ms
64 bytes from gru06s28-in-f228.1e100.net (172.217.29.228): icmp_seq=4 ttl=56 time=30.3 ms
^C
--- www.google.com ping statistics ---
4 packets transmitted, 4 received, 0% packet loss, time 3005ms
rtt min/avg/max/mdev = 28.123/29.784/32.183/1.630 ms
If you have already used a variation of the ping command on another operating system, note that on Linux by default it runs indefinitely. To terminate it (as weel as to terminate any command on Linux), press Ctrl + C.
If any of the above commands have not worked as expected, you should go back and double check your network settings.
Remote access using SSH
If you followed the previous post to the letter, during installation you enabled remote access via SSH. So it is already working on your server.
Let’s see how we can access our server command line remotely.
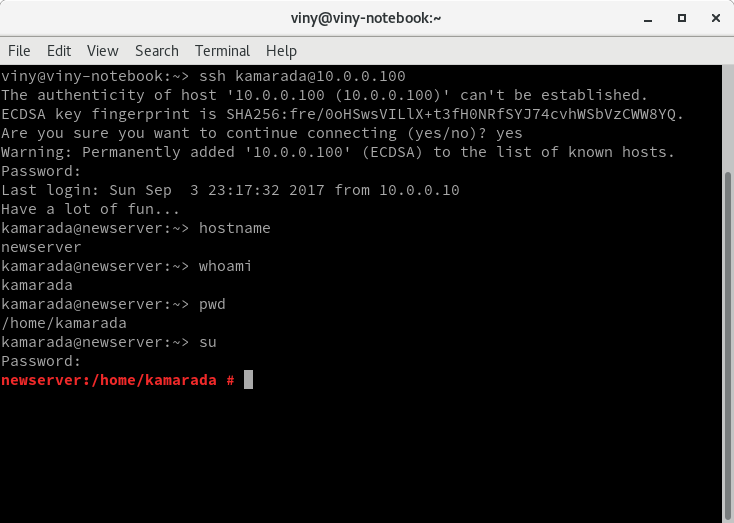
Using a computer on the same network as your server (it can be a desktop or even another Linux server), open a terminal and invoke the ssh command, passing an username (e.g. kamarada) and the IP address (10.0.0.100) or hostname of the server as arguments:
1
$ ssh kamarada@10.0.0.100
As this is the first time you connect to the server, the computer asks if it should trust the SSH key sent by the server and continue connecting:
1
2
3
The authenticity of host '10.0.0.100 (10.0.0.100)' can't be established.
ECDSA key fingerprint is SHA256:fre/0oHSwsVILlX+t3fH0NRfsYJ74cvhWSbVzCWW8YQ.
Are you sure you want to continue connecting (yes/no)?
Type yes and hit Enter.
Next you must inform the user password and hit Enter:
1
2
3
4
5
Warning: Permanently added '10.0.0.100' (ECDSA) to the list of known hosts.
Password:
Last login: Sun Sep   3 23:17:32 2017 from 10.0.0.10
Have a lot of fun...
kamarada@newserver:~>
That’s it! Now you have access to your server command line interface. Any command run on that terminal will be actually run on your server:
1
2
3
4
5
6
7
kamarada@newserver:~> hostname
newserver
kamarada@newserver:~> whoami
kamarada
kamarada@newserver:~> pwd
/home/kamarada
kamarada@newserver:~>
Let’s use that SSH session to go on setting up our server.
To switch from the kamarada user to the root user, run the command su (which stands for superuser). Type the root password and hit Enter:
1
2
3
kamarada@newserver:~> su
Password:
newserver:/home/kamarada #
With remote access via SSH, you can manage your server using your desktop
Users
If more people besides you are going to access the server, you should create an user account for each of them, so each one can access the server using their own user accounts. Managing users on openSUSE is an easy task using YaST.
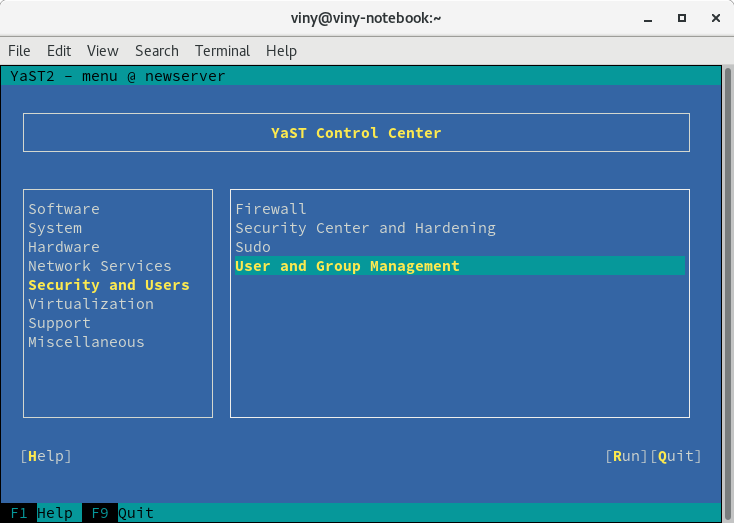
Within the SSH session, start YaST:
1
# yast
Select Security and Users by the left and User and Group Management by the right:
YaST shows the list of system users (by now, we have only the kamarada user created during installation):
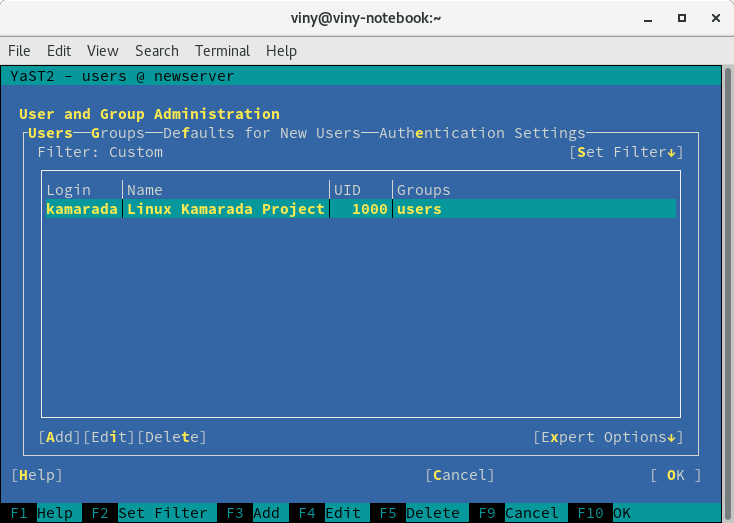
Choose Add. Enter the new user data and choose OK:

Back to the previous screen, you can see the new user on the list.
Create as many user accounts as you need. When you finish, choose OK to apply changes. YaST creates the new user accounts and take you back to its main screen.
Sync date and time using NTP
During installation, we’ve set up our server time zone. I’ve already wrote an entire post on how to sync the system time with NTP. You may want to read that post, as that procedure can be run on servers as well. But since our server time zone is already setup, we don’t need to review all of the date and time settings. Here, I’m going to shortly explain how to set up just the NTP client.
On YaST’s main screen, select Network Services by the left and NTP Configuration by the right. By default openSUSE already syncs system time with some time servers:
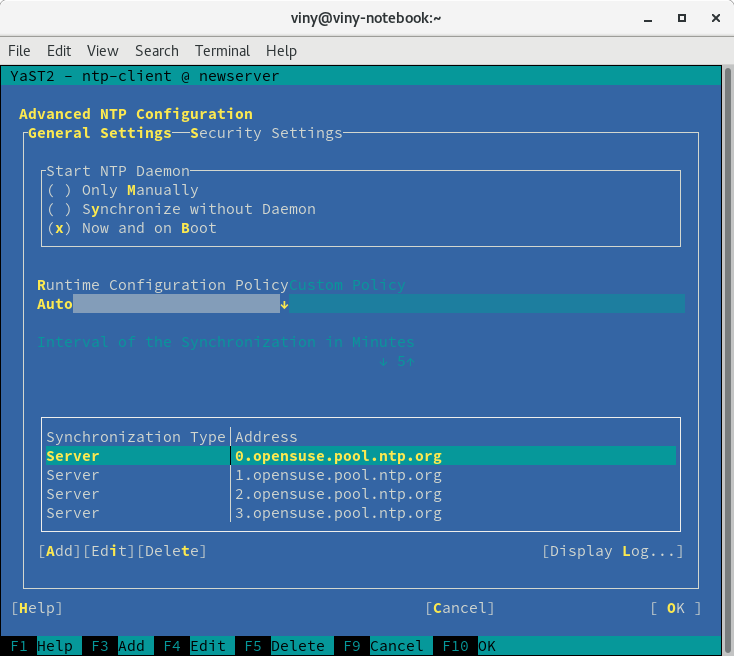
You should remove all of those servers and add your local network time server (e.g. 10.0.0.1) or your ISP time server, if there are any. If not, you can add the public NTP server nearest to you. For more info on that, visit the NTP project official website.
I’m going to use the official time server provided by the Brazilian project NTP.br.
To remove a time server, select it on the list and choose Delete.
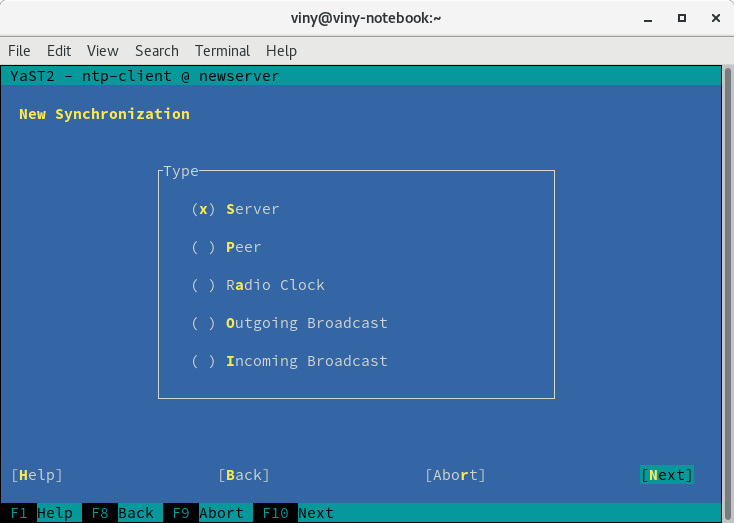
To add a time server, choose Add.
On the next screen, keep the default Server option selected and choose Next:
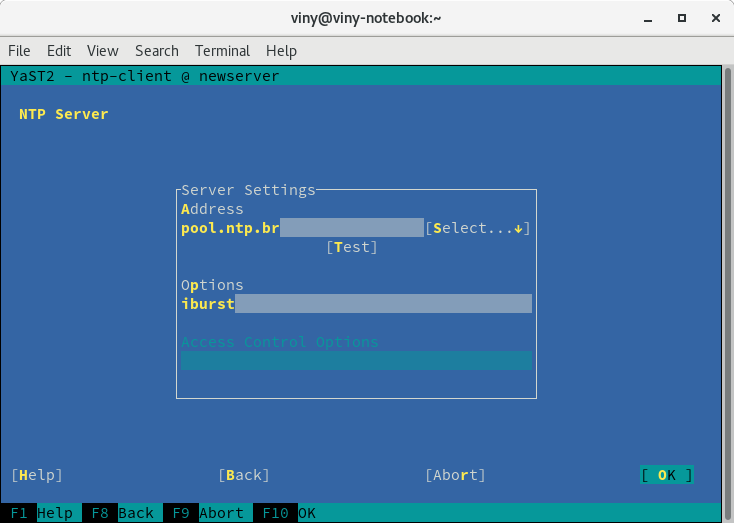
Enter the time server Address (e.g. pool.ntp.br) and choose OK:
When you are finished setting up the NTP client, choose OK:
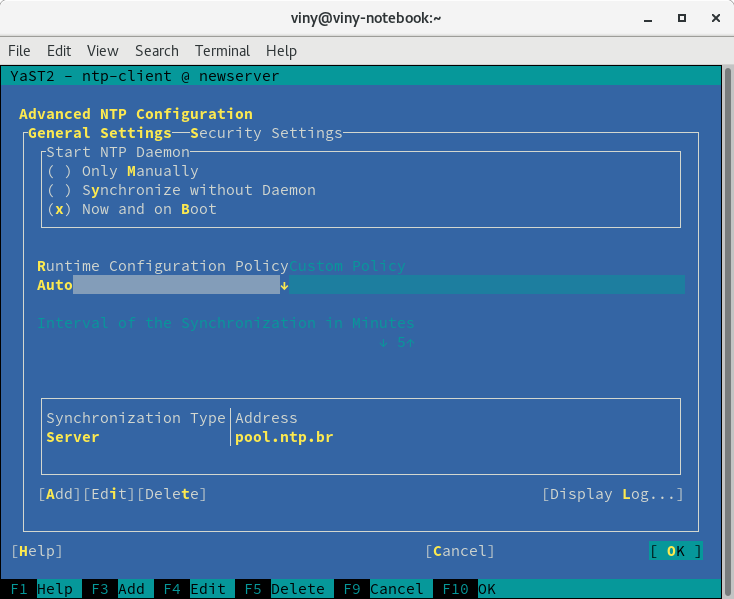
YaST saves NTP settings, restarts the NTP client (that should sync your system time) and returns to the main screen. Choose Quit.
Back to the command line, run the date command to check system time:
1
2
# date -R
Thu, 15 Mar 2018 23:40:12 -0300
Software repositories
During installation, we’ve already set up software repositories, but we used only the official ones. Now, you have the opportunity of adding any semi official or third-party repositories you want, as well as switching from the official repositories to mirrors.
Start YaST again:
1
# yast
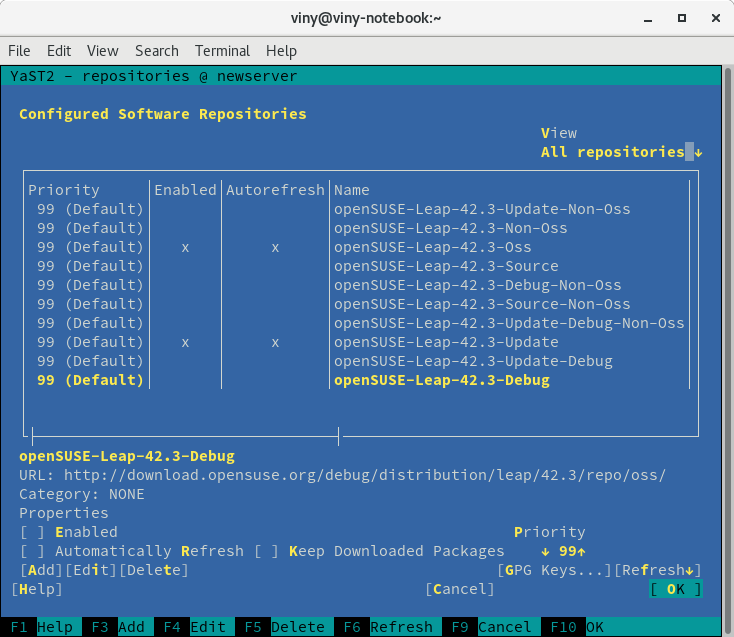
On the main screen, chose Software by the left and Software Repositories by the right. YaST lists configured repositories:
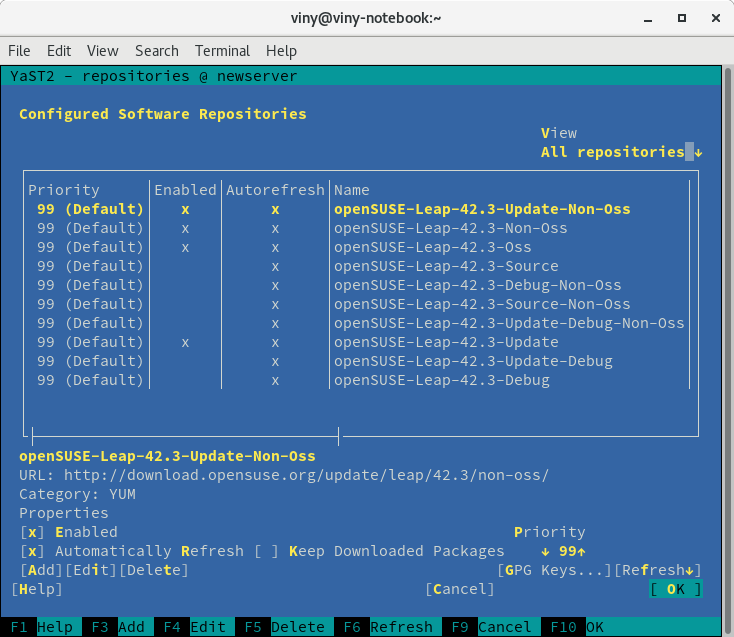
It seems that repository selection we’ve made during installation has been applied only during installation… I recommend you to repeat that configuration by enabling only the repositories:
- Main Repository (OSS)
- Main Update Repository
To disable a repository on that list, select it using the up and down arrow keys and uncheck Enabled with Alt + E. If auto-refresh is also enabled for the repository, disable it with Alt + R. Go back to the list using Shift + Tab.
Repeat that until all unwanted repositories are disabled.
Your repository list should end this way:
You may want to retrieve packages not from download.opensuse.org, but from a closer mirror. Visit mirrors.opensuse.org to see a complete list of all mirrors you could use. Pick the one which is closest to you (for instance, I’m in Brazil, I chose C3SL). Copy its URL from that page (e.g. opensuse.c3sl.ufpr.br), Edit your repositories and make the move. To illustrate, I changed the URL of the Repository OSS from:
1
http://download.opensuse.org/distribution/leap/42.3/repo/oss/
To:
1
http://opensuse.c3sl.ufpr.br/distribution/leap/42.3/repo/oss/
When you finish, choose OK. YaST applies changes, refreshes the repositories metadata and takes you back to its main screen.
Updates
During installation, we enabled the update repository, so the system was installed with all updates available to that moment. I already explained on another post how to update openSUSE. As we don’t have a graphical interface on our server, only the command line, let’s use the zypper command to check for updates.
Here I’m going to shortly remember the commands I presented on that post.
To refresh the list of packages available on the online repositories:
1
# zypper ref
To download and install available updates if there are any:
1
# zypper up
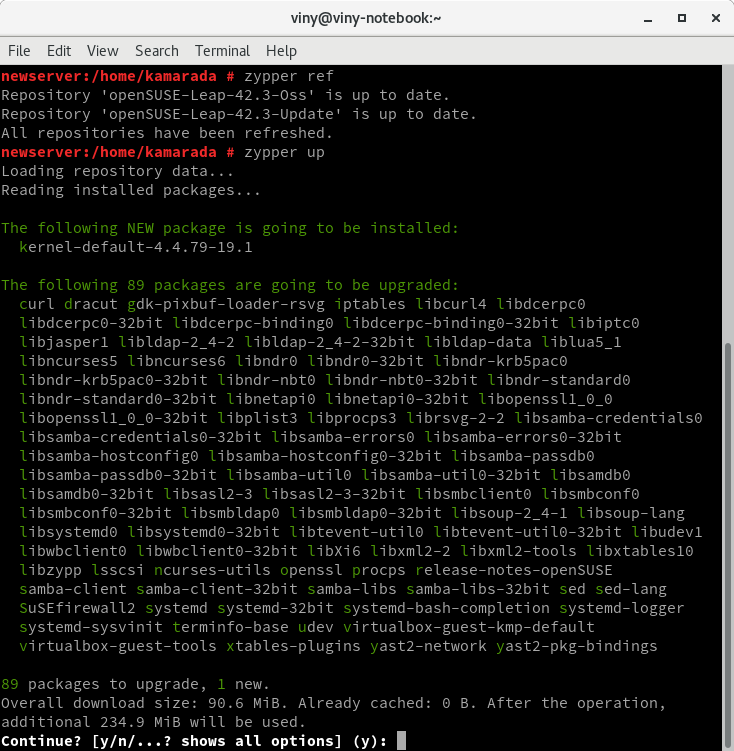
Note that you may need to reboot the server after updating.
Ready to launch
First things first, now our server is minimally setup and ready to install services.
If you are not going to use it by now, you can finish your SSH session with the exit command. You will be back to your computer’s command line interface:
1
2
3
4
kamarada@newserver:~> exit
logout
Connection to 10.0.0.100 closed.
kamarada@desktop:~>
Remember to check for software updates from time to time.
Follow the Linux Kamarada Project to discover interesting things you can do with openSUSE servers.
And… have a lot a fun!


