This is the part 2 of our trilogy of posts about how to transact bitcoins using the Electrum Bitcoin wallet. In part 1, you’ve seen what Bitcoin is and some basic concepts, how to install Electrum and set it up. If you fell into this page, I recommend you start reading at the first part:
Now that our Electrum wallet is ready to use, today let’s see how to transfer bitcoins to it.
As I said, someone who already has bitcoins can transfer you some (in this case, this someone can follow today’s post). Another option is: you can buy bitcoins on an exchange and transfer them to your wallet (whole bitcoins are very expensive today, I recommend you to buy satoshis to get started). This is the quickest way of getting bitcoins and usually the way people get started with it.
Also as I said, I’m going to use the Binance exchange as example, but you can buy bitcoins on any exchange you trust, the process of transferring them to Electrum should be similar.
I’ll try not to dive into Binance details here, because I want to focus on Electrum, and also because Binance is an international exchange and how to use it may differ in your country. In case of doubt, you can refer to the Binance Support, which has lots of guides for everything.
I’m going to assume you have already registered on Binance, enabled two-factor authentication (2FA) and completed identity verification — you are going to supply the exchange with some identity information, a process required by most exchanges today and known in general as Know Your Customer (KYC). Some people see it as good — a safety measure — others see it as bad — privacy threat. I’m not going to discuss that here.
Now, with no further ado, let’s move on!
Deposit: transferring fiat from bank to exchange
Fiat currency (also known as fiduciary currency) is any government-backed currency, such as the United States dollar (symbol: $; code: USD) or the Brazilian real (symbol: R$; code: BRL).
Binance allows credit card and wire transfer purchases of cryptocurrencies, depending on your country. Buying with a credit card is usually faster, but a little more expensive (up to 3.5% for USD purchases, according to 99Bitcoins). So, I prefer to deposit fiat to Binance by bank transfer and then buy crypto with the cash balance. Fiat deposits are free of fees on Binance. You can find more information on the following texts on Binance Support:
- How to get started with Fiat Funding
- How to Buy Cryptos with Credit/Debit Card
- Bank Transfer
- How to deposit BRL on Binance (this probably interests Brazilian users only)
For the purpose of demonstration, I’m going to transfer R$ 1,000.00 (a thousand reais, or nearly $ 180, in today’s exchange rate) to Binance. At first sight, it may seem a high amount, but a smaller amount may not be interesting, because of Bitcoin transaction fees.
I would like to remember a note from the beginning: the Bitcoin price is volatile, I recommend that you do not follow this tutorial to the letter if there is no need, as you may lose money.
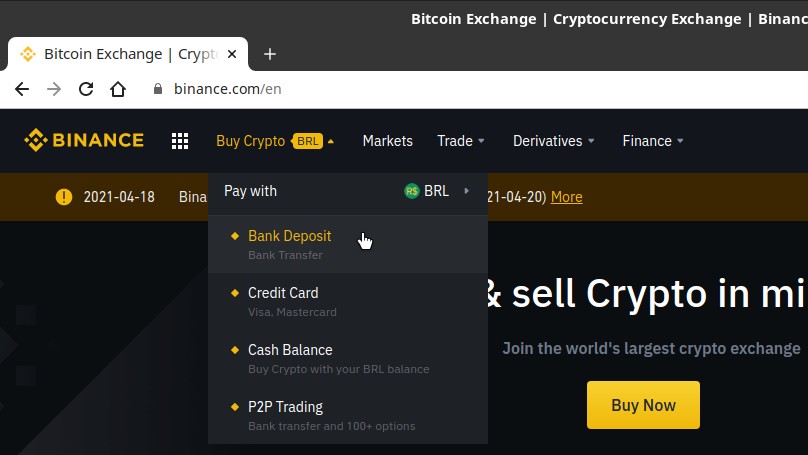
To deposit fiat on Binance, once you are logged in, hover over Buy Crypto on the top navigation bar and then click Bank Deposit:
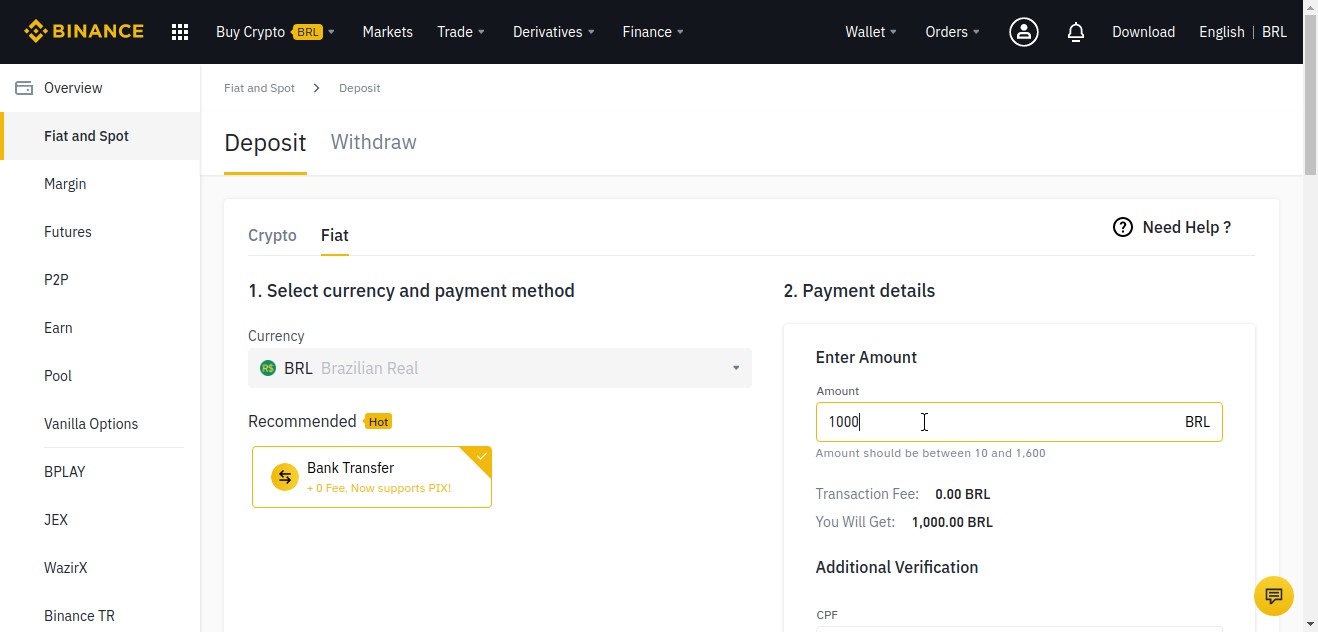
Select your currency and payment method, enter the amount you are going to transfer as well as any other requested information:
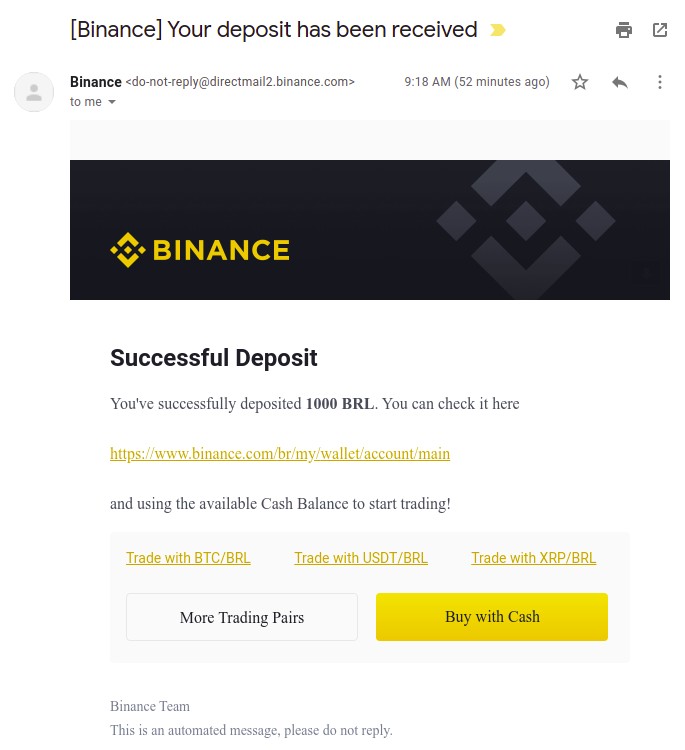
Make the transfer and wait for the Binance email informing your deposit has been received:
Now your Binance account is funded with fiat and you can proceed to buy bitcoins.
Buy: converting fiat into crypto
On Binance, you can buy bitcoins anytime, even on non-business hours and weekends.
To buy bitcoins with your fiat balance, hover over Buy Crypto on the top navigation bar and then click Cash Balance.
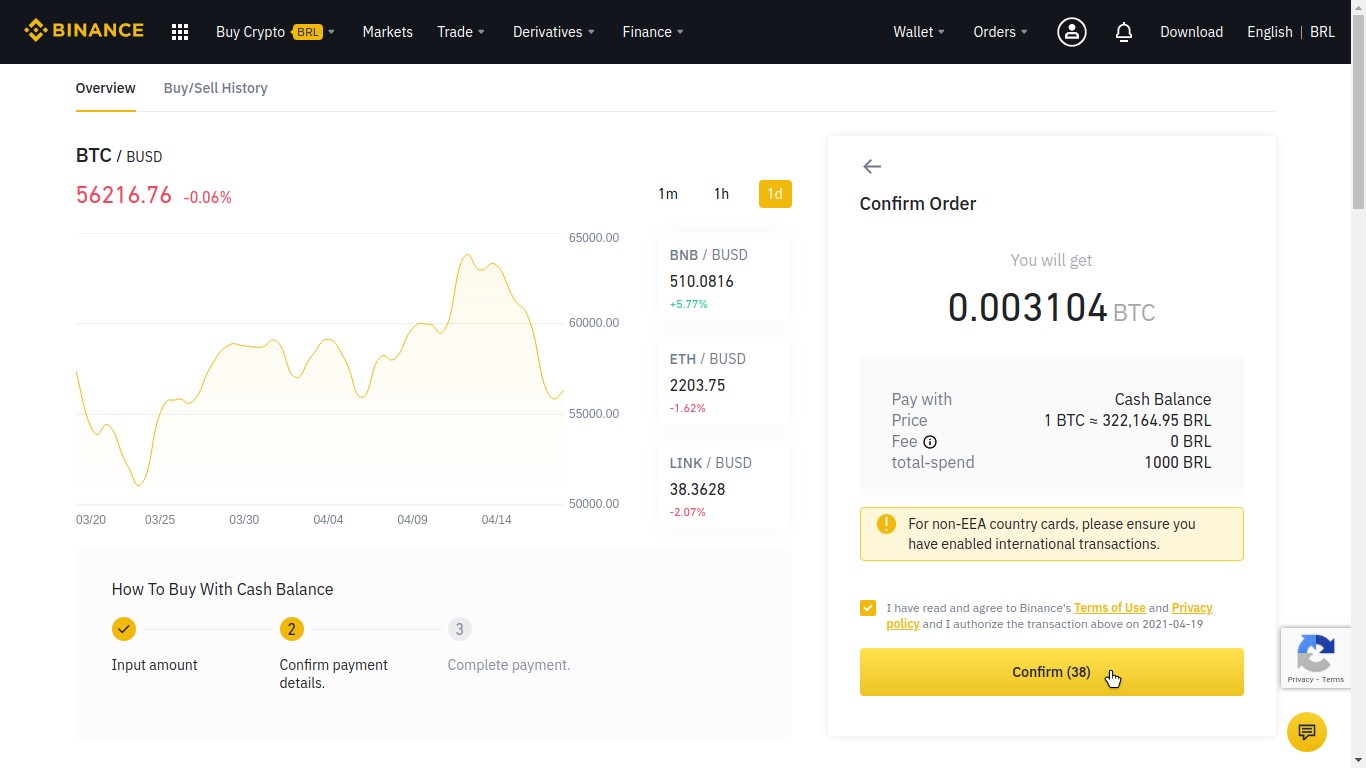
Select the fiat currency to spend (e.g. USD, EUR, BRL) and enter the amount (e.g. 1,000 BRL). Choose the crypto that you want to buy (in our case, BTC) and click Buy:

Check transaction details and click Confirm:
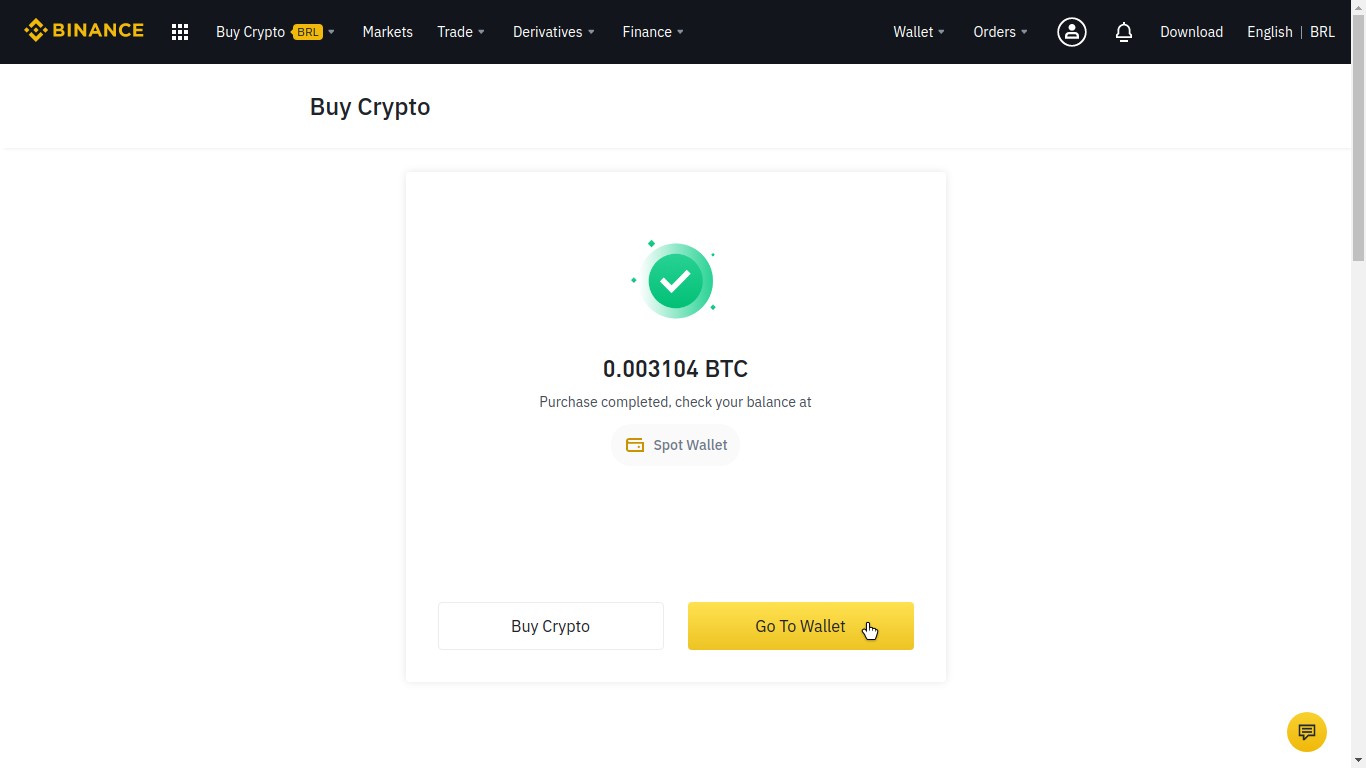
The purchase is executed immediately. Click Go To Wallet to see your BTC balance:
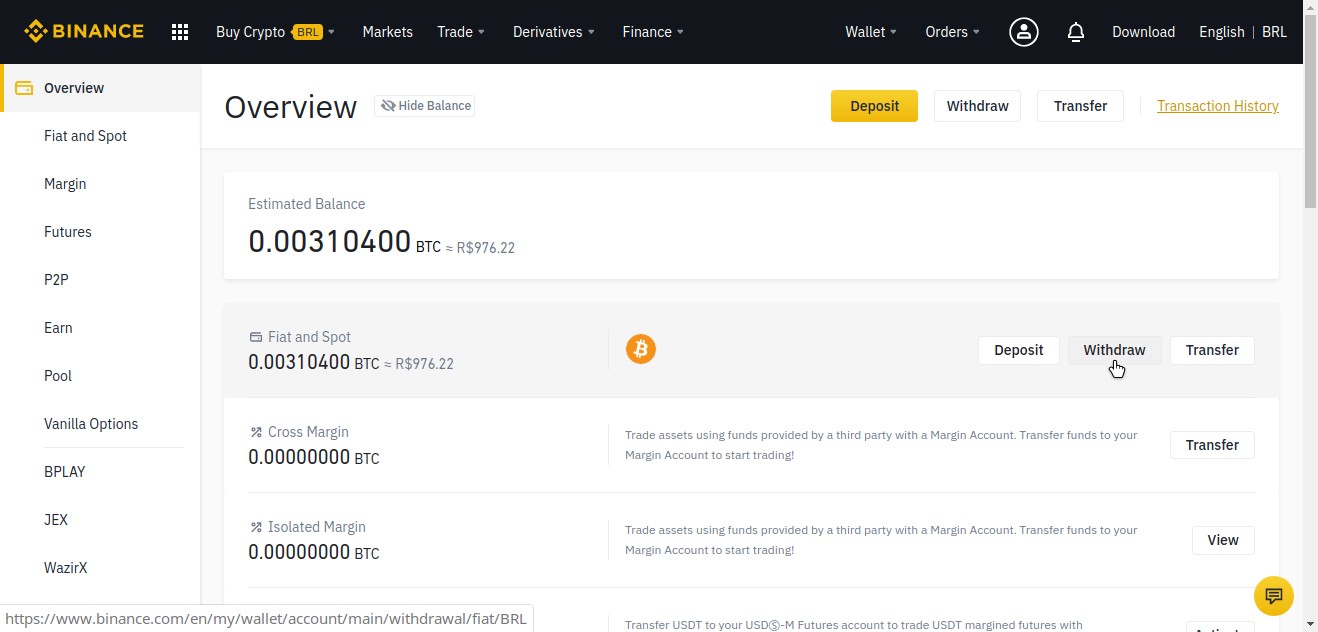
Another way to reach that same screen is Wallet > Overview:
The following pages of the Binance Support can give you more information about the buying options offered by Binance:
Custodial versus non-custodial wallets
As we have seen previously, there are many types of wallets. And now it’s a perfect time to explain another possible categorization for wallets: custodial versus non-custodial.
A non-custodial wallet is a wallet that allows you as its user to own the private key. No one other than yourself has access to the private key. Remember that bitcoin transactions need to be signed using the private key. This means that a non-custodial wallet gives you full control of your funds, as only you (with your private key) are able to transfer your bitcoins. Electrum is an example of a desktop non-custodial wallet.
A custodial wallet is similar to today’s bank accounts where you keep your money. If you don’t want to keep your bitcoins with you, you can keep them on a custodial wallet whose private keys are managed by a third party you trust. Any Bitcoin exchange like Binance is considered to be a web custodial wallet.
Note that a custodial wallet does not give you the private key, so you don’t have full control of your funds. For instance, if the exchange goes offline for a while, you won’t be able to use your bitcoins during the outage. Worse, exchanges are subject to hacker attacks. Other risks include the company might freeze your funds, go bankrupt or commit fraud and steal your coins. There is a popular saying in the crypto community: “not your keys, not your coins”. You are advised not to keep your bitcoins on the exchange and transfer them to your own wallet.
Of course, non-custodial wallets aren’t a perfect 100% safe solution. For instance, if your computer is taken away, you may lose your coins, if you don’t have written down your seed.
It’s up to you to decide where you are going to keep your bitcoins.
But following our how-to, let’s transfer our newly purchased bitcoins from Binance to Electrum.
Withdraw: transferring crypto from exchange to wallet
Bitcoin transactions can be made at any time, including non-business hours and weekends. Remember that on every Bitcoin transaction there is a fee to be paid to miners, so you can’t transfer your total Bitcoin balance.
Binance does not charge additional fees on top of that, just the transaction fee, which is estimated based on the current network transaction fees and cannot be changed by the user. Also, for each withdrawal request, Binance does not allow you to withdraw less than a minimum amount. Both the withdrawal fee and the minimum withdrawal are informed on the withdrawal page, but you can also check them visiting the Fee Schedule page.
To receive bitcoins on your Bitcoin wallet, you need an address. Open Electrum and select the Receive tab:

Optionally, give a Description to the transaction. Then, click New Address to receive one.
Copy the receiving address to the clipboard:

Open your Binance wallet (Wallet > Overview) and click Withdraw on the BTC line.
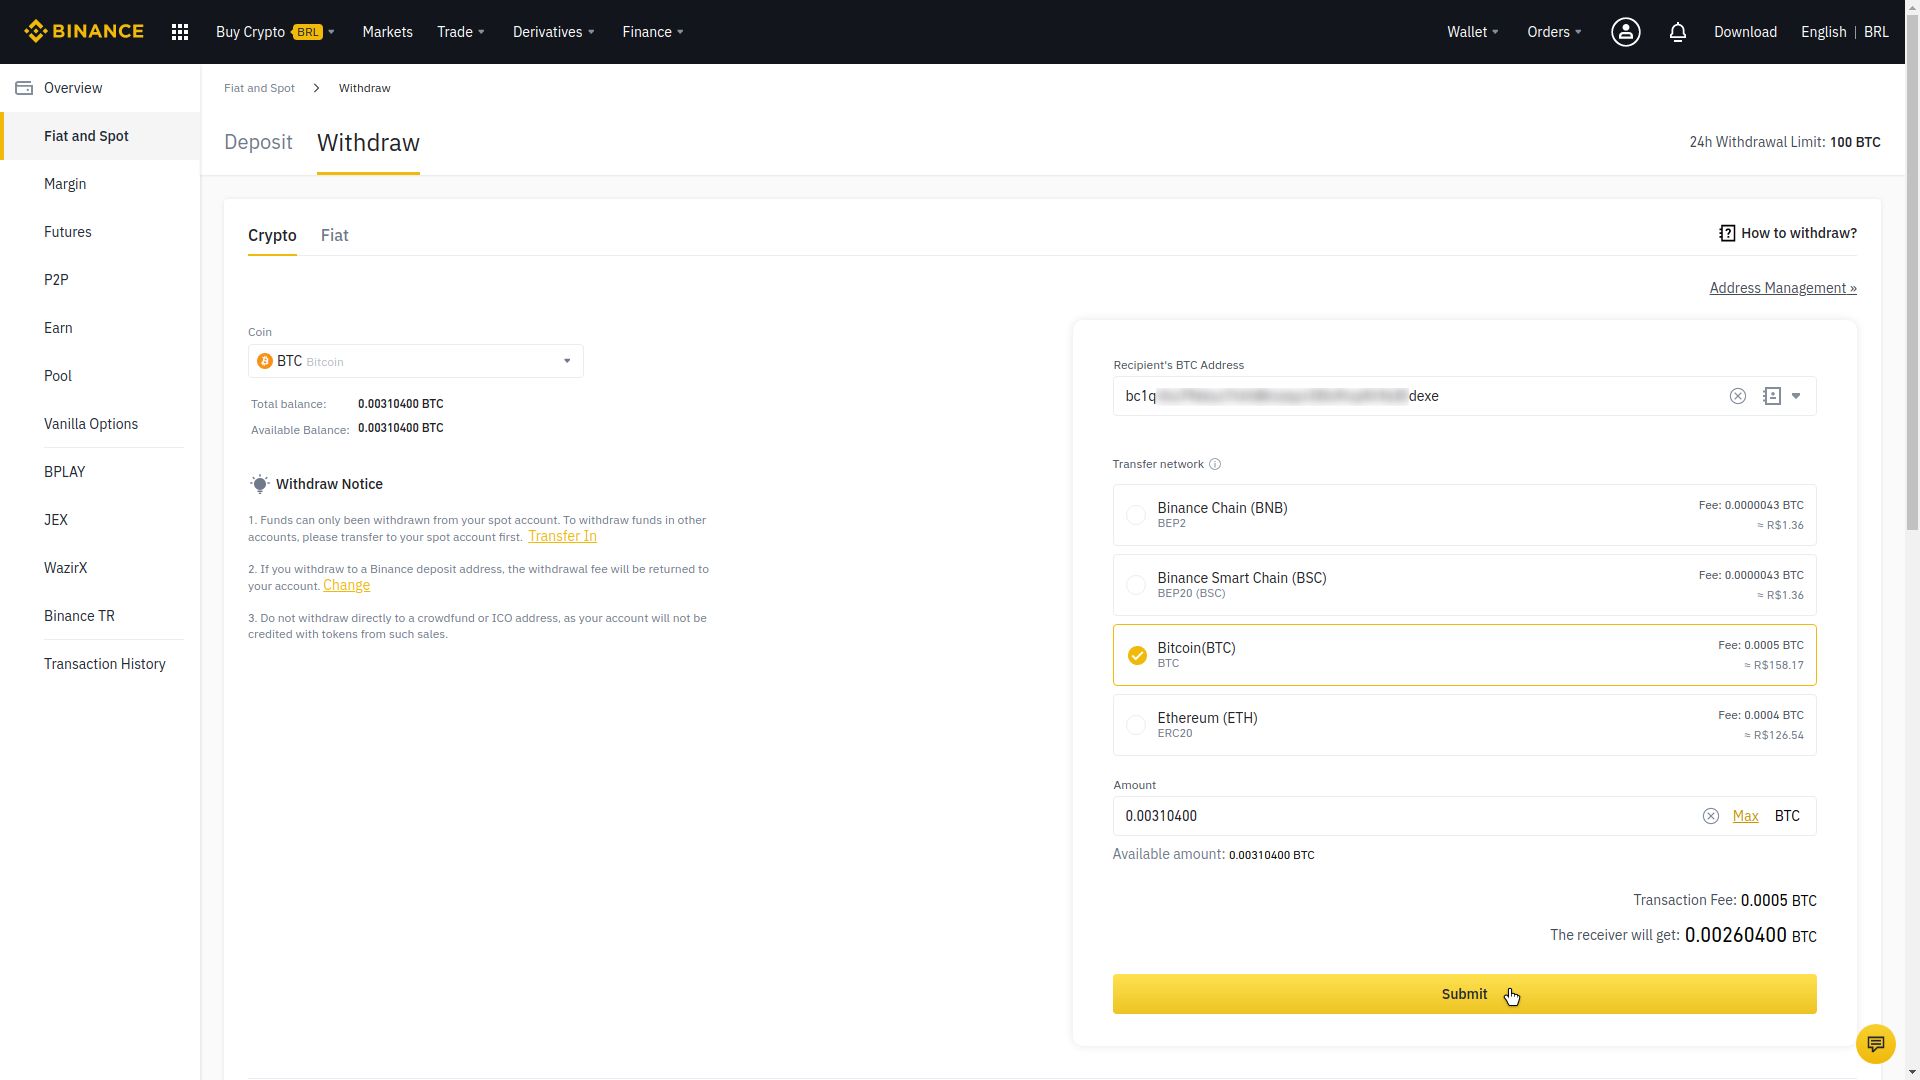
By the left, select the Coin you want to withdraw. Here, we are going to withdraw BTC.
By the right, on Recipient’s BTC Address, paste the address copied from Electrum.
On Transfer network, select Bitcoin (BTC).
Enter the withdrawal Amount. Here, I clicked Max (maximum).
Check the Transaction Fee and the amount The receiver will get (which is equal to the Amount you informed less the Transaction Fee). Click Submit when you are ready.
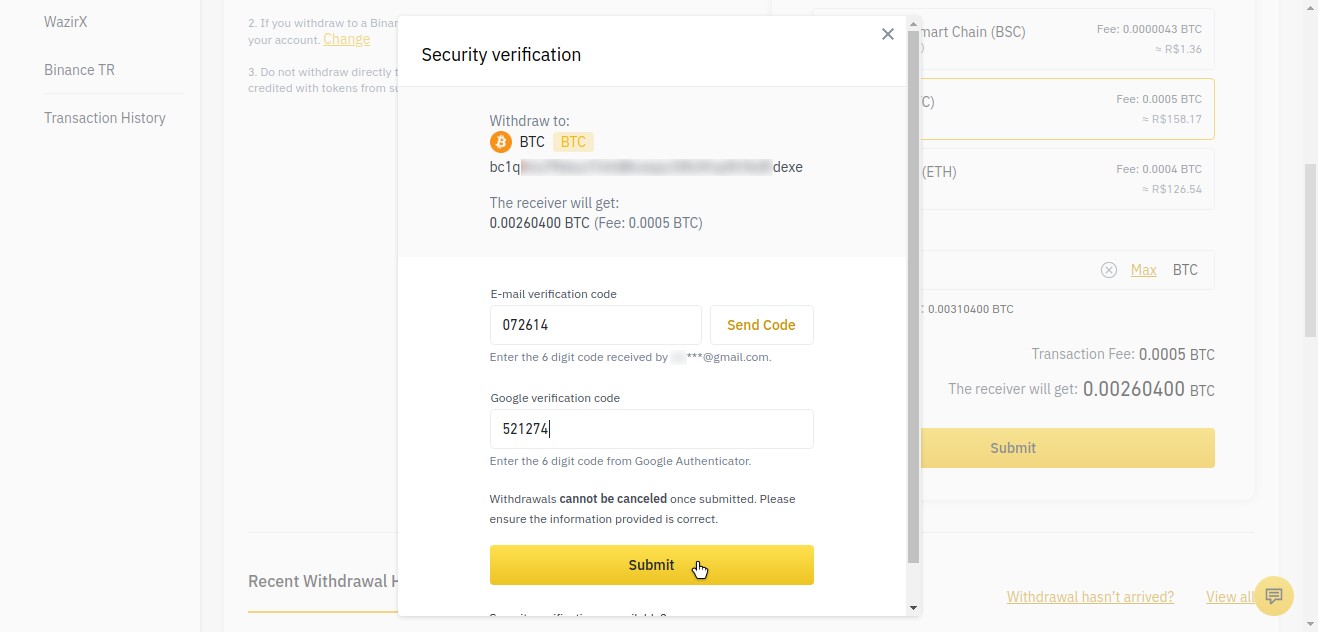
Click Send Code and Binance will send you an email with a verification code. Enter that code here to continue. Also, enter the 2FA code generated by your 2FA app. Pay attention to the warning on the screen: withdrawals cannot be canceled once submited. So, take a last look at the transaction information to ensure it is correct and click Submit:
That’s it, we are done with Binance:
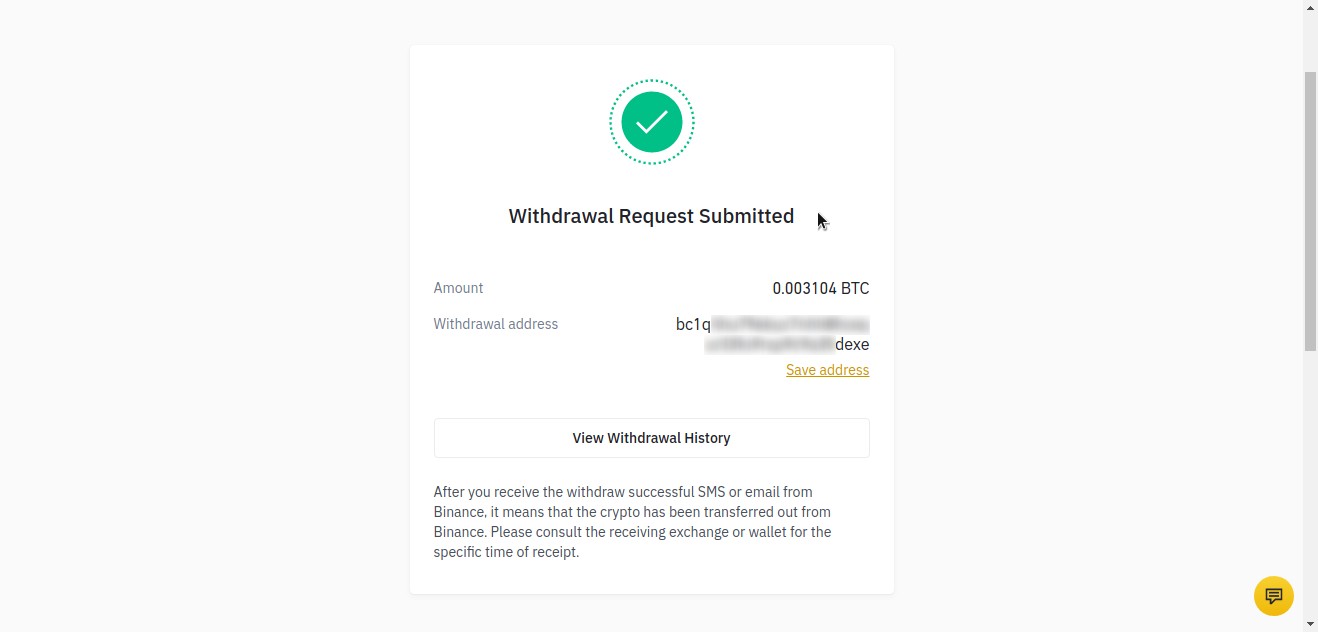
Usually exchanges don’t send funds immediately, they often batch users transfers to save on fees, so you can expect a few minutes delay.
Wait for an email from Binance entitled Withdrawal Successful.
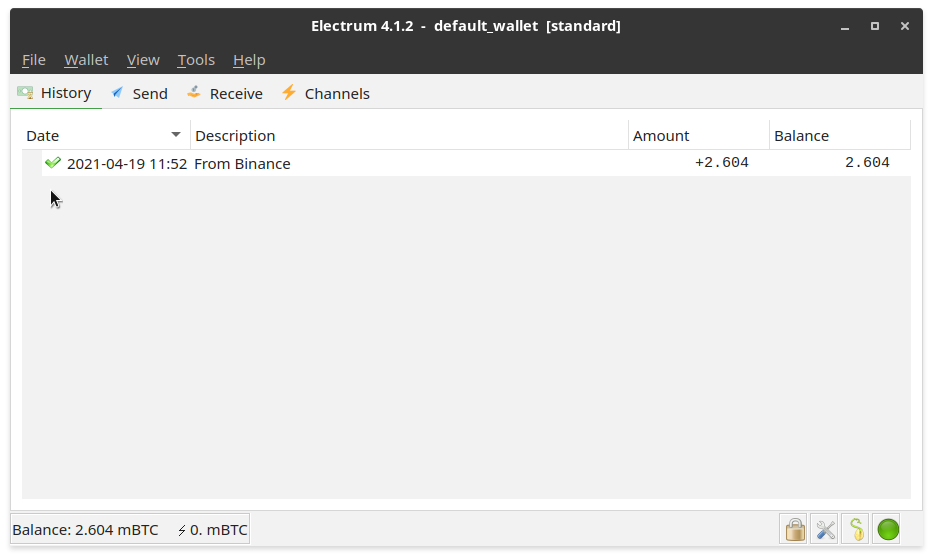
When you receive that email, you can go back to Electrum and switch to the History tab:
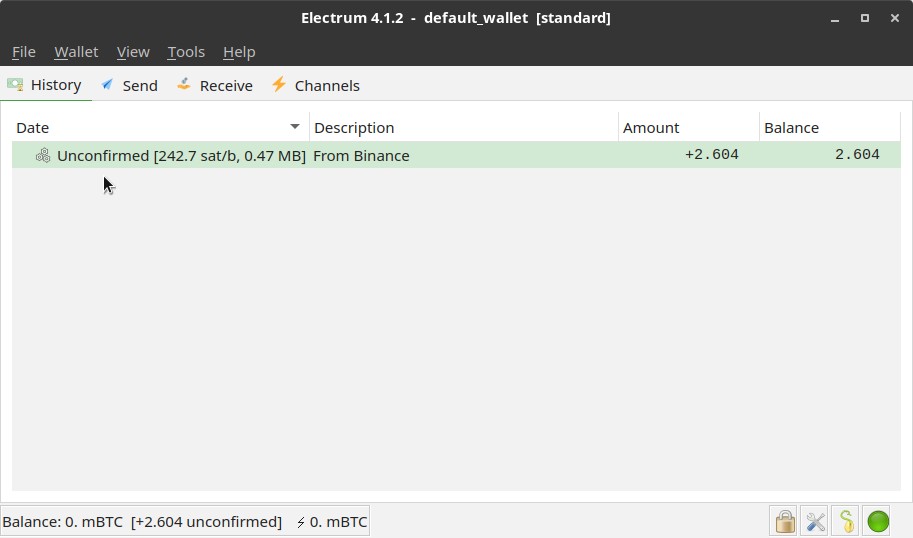
The transaction will initially be marked as Unconfirmed, indicating that it has been broadcast, but it has not yet been added to the blockchain. Next, you need to wait for miners to confirm the transaction so you can use the bitcoins. Note that the status bar displays Balance: 0 mBTC, as if there were no bitcoins on the wallet yet.
You can see transaction details by right clicking it and then clicking View Transaction:
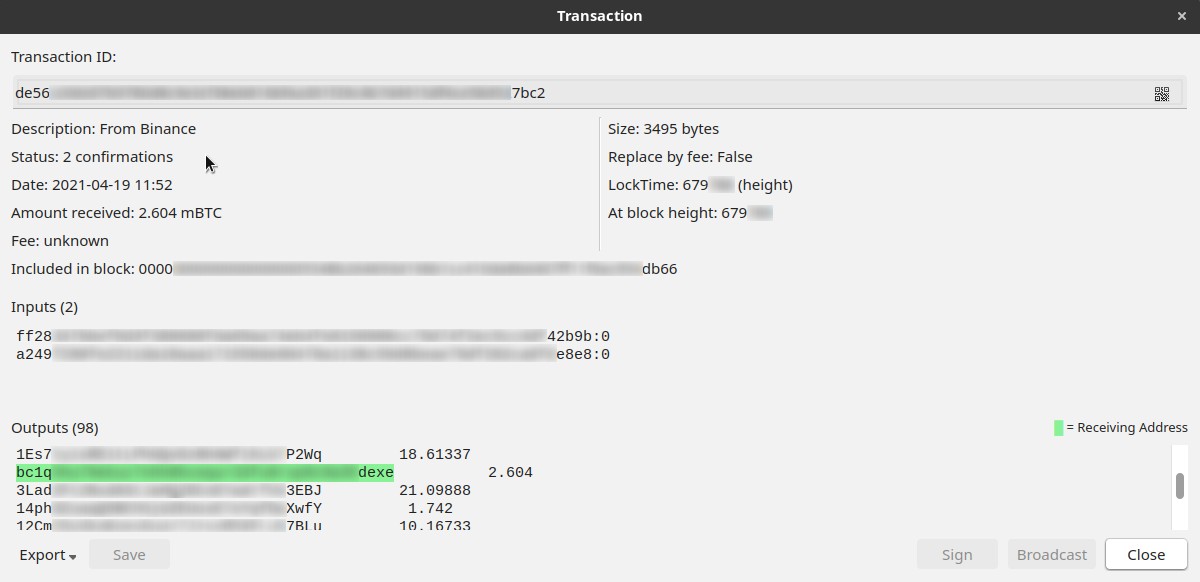
The confirmation process takes a few minutes, but it’s automatic: it does not require human intervention, only the work of the computers connected to the Bitcoin network (the miners).
After some confirmations (usually at least six), the transaction appears as confirmed, with a checkmark next to its timestamp:
That indicates that the transaction has been recorded into the blockchain and now you can use the bitcoins. Note the updated balance on the status bar.
In case you need more information about the Binance withdrawal process, please refer to the following pages of the Binance Support:
To be continued…
In part 3, you are going to see how to transfer bitcoins from Electrum to an exchange, in case you need to sell them (and how to do so).


