
If you want to create an openSUSE-based Linux distribution, like Linux Kamarada, you need to learn about KIWI.
KIWI is an open source tool developed by the openSUSE Project that allows you to create Linux system images, mainly based on openSUSE and SUSE Linux Enterprise, but also on other distributions. With KIWI, you can create images in different formats for different use cases, including:
- Live ISOs (such as LiveCDs, LiveDVDs, LiveUSBs);
- Virtual machines (such as QEMU, KVM, VirtualBox, VMware, Xen, WSL);
- Cloud (Amazon EC2, Google Compute Engine, Microsoft Azure);
- Containers (Podman, Docker, Containerd);
- Embedded devices (Raspberry Pi, Pinephone);
- and more (PXE).
Creating images with KIWI is an automated process – KIWI itself is a set of Python and Bash scripts – and does not require human interaction – all the information KIWI needs it reads mainly from XML files and scripts. Besides that, it can be integrated with the Open Build Service (OBS). All this makes KIWI ideal for DevOps. Whether you need to create environments on demand or distribute pre-configured systems, KIWI can help you a lot.
Basic concepts
A system image (usually called just “image”) is a complete installation of a Linux system within a file. This file can be an ISO image to be burned to a CD/DVD, a VDI virtual disk image to be used in VirtualBox, a .raw archive to be extracted to a memory card to be inserted into a Raspberry Pi, etc.
Among the KIWI concepts, there is also the concept of appliance, which is a pre-configured system created for a specific purpose. It includes a set of packages and settings optimized for a specific purpose. An appliance can have different types of images, which can be used, as we have seen, on physical, virtual or cloud machines.
For example, Linux Kamarada is an appliance, a system targeted at Linux beginners. At the moment, Linux Kamarada only produces ISO images that can be used on desktops and laptops, but it could also produce images for Raspberry Pi, Pinephone, WSL, etc.
Steps of the image building process
The image building process with KIWI is divided into two steps.
The first is the prepare step, in which KIWI prepares the root filesystem of the image. In this step, KIWI installs packages and applies customizations to the system, such as configuration scripts and file additions. At the end of this step, you can, if you wish, chroot to test the system (but note that this is not recommended, nor is making modifications manually; I mention the possibility just for you to understand what the final result of this step is).
The second is the create step, in which KIWI packages the file system generated in the prepare step and generates the ready-to-use image – for example, an ISO image, or a VDI virtual disk image, or a .raw file, etc. In this step, KIWI can also apply customizations to the image – for example, add a PDF manual to the ISO image, so that the end user can read it without booting from the CD/DVD/USB.
Normally, if everything goes well, KIWI does not pause after the prepare step and directly proceeds to the create step. However, it is possible to run KIWI to do only the prepare step and then run it again to do only the create step.
If something goes wrong, knowing that these two steps exist helps you identify where the error is based on the message displayed by KIWI.
Prerequisites
To use KIWI, your system needs to meet the following requirements:
- a recent, up-to-date Linux distribution, preferably (but not necessarily) the same distribution of the image (for example, if you are going to use KIWI to create an openSUSE Leap image, it is recommended that you also use openSUSE Leap to run KIWI);
- Python version 3.5 or higher (package python311);
- enough free disk space to prepare and create the image, the recommended minimum is 15 GB, but depending on what you want to do, you may need 40 GB (e.g. to build Linux Kamarada) or more;
- Git (package git), for cloning repositories (not really necessary to run KIWI, but we will use it in this tutorial to download the examples); and
- any virtualization technology to test the image (also not really necessary to run KIWI, but we will use it in this tutorial, and I recommend you install VirtualBox).
Installing KIWI
The most up-to-date KIWI packages can be found on the openSUSE Build Service in the Virtualization:Appliances:Builder project. Obtaining them from there is the recommended way to install KIWI.
To install KIWI on openSUSE Leap 15.6 this way, run:
1
2
# zypper addrepo http://download.opensuse.org/repositories/Virtualization:/Appliances:/Builder/openSUSE_Leap_15.6 kiwi
# zypper --gpg-auto-import-keys install python311-kiwi
To test if KIWI has been successfully installed, run:
1
$ kiwi -v
This command should inform the installed KIWI version:
1
KIWI (next generation) version 10.2.16
KIWI can also be installed in other ways. If you need more information, see the KIWI documentation.
KIWI example image descriptions
There are two GitHub repositories where you can get official KIWI example image descriptions:
- in the official
kiwirepository, in thebuild-testsfolder; and - in the community-maintained
kiwi-descriptionsrepository of examples.
openSUSE Leap 15.6 live images are no longer listed on the get.opensuse.org website, but I found them “hidden” here. The sources for these images can be found on the openSUSE Build Service in the openSUSE:Leap:15.6:Images project.
You can also use Linux Kamarada as an example. The source code for the image is available on GitLab, in the Linux-Kamarada-GNOME repository.
If you know of any more KIWI images whose source code is public and could serve as examples, please let me know in the comments.
Creating your first image with KIWI
To demonstrate how KIWI works and use it for the first time, let’s create an image based on an example.
Start by installing Git if you don’t have it already:
1
# zypper in git
Then, get the KIWI source code:
1
$ git clone https://github.com/OSInside/kiwi.git
The source code is cloned to the kiwi folder and the examples are in the build-tests folder inside it. You can list the examples with the following command:
1
$ tree -L 3 kiwi/build-tests
I chose to use the example of the live image based on openSUSE Leap 15.6 (x86/leap/test-image-live), but feel free to choose another example.
So, from where we are, the path to this example is: kiwi/build-tests/x86/leap/test-image-live.
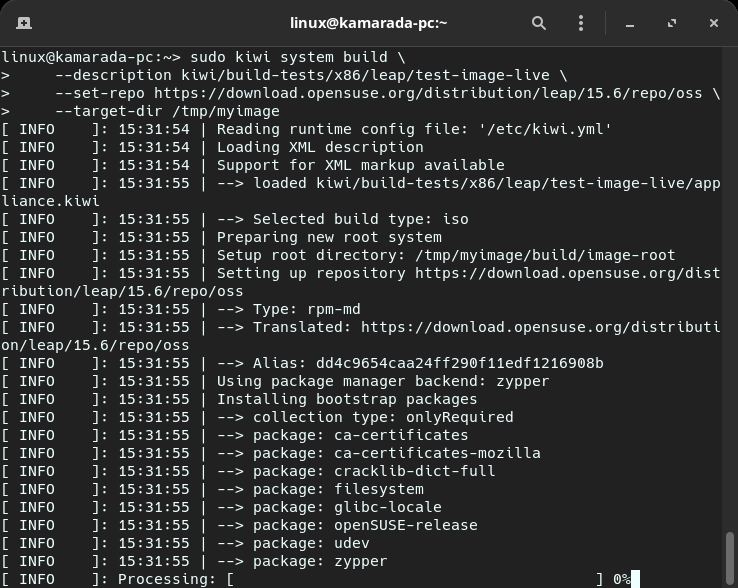
To prepare and create the image based on this example, invoke the kiwi command as follows:
1
2
3
4
$ sudo kiwi system build \
    --description kiwi/build-tests/x86/leap/test-image-live \
    --set-repo https://download.opensuse.org/distribution/leap/15.6/repo/oss \
    --target-dir /tmp/myimage
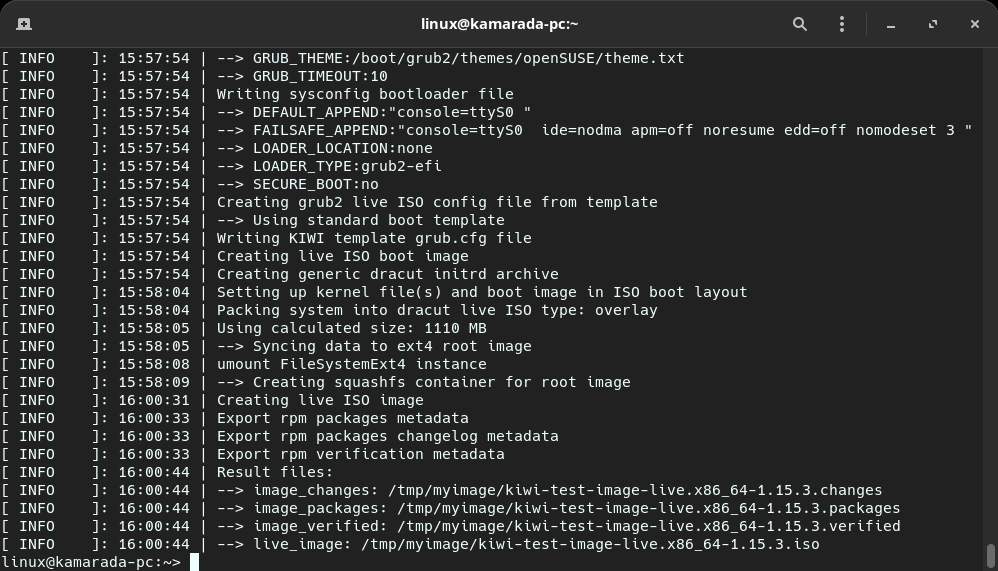
KIWI starts running, the process may take a few minutes:
At the end, KIWI indicates the path to the produced ISO image:
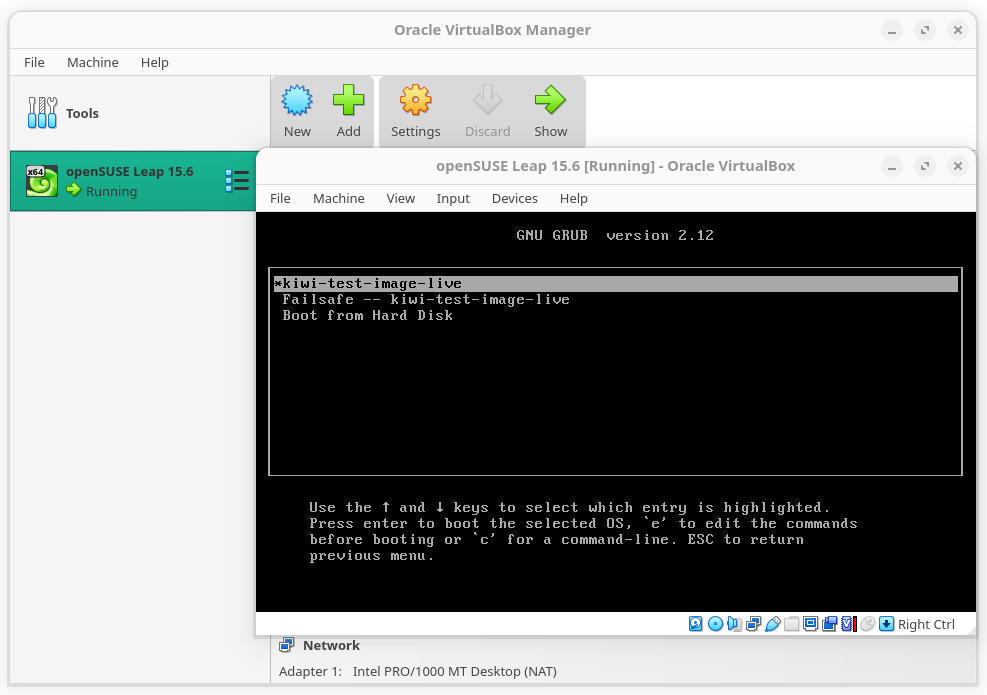
To test the ISO image, create a VirtualBox virtual machine, insert the ISO image into the virtual DVD drive, and start the virtual machine:
To enter the system, the username is root and the password is linux:
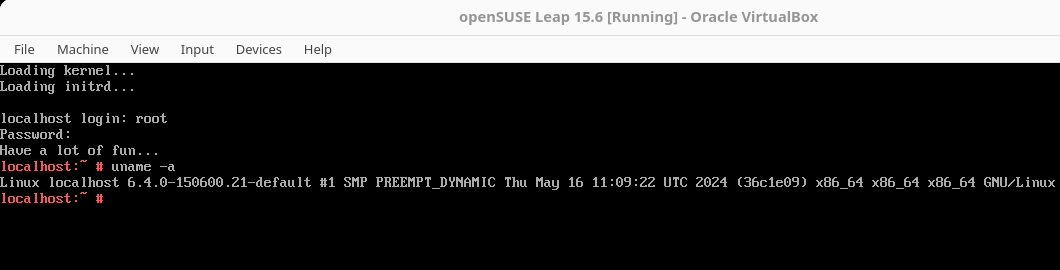
Congratulations! You’ve created your first image with KIWI. And it has been tested and it is working!
Note that KIWI generated some more files in the /tmp/myimage folder:
1
2
3
4
5
6
7
8
9
10
11
12
13
14
$ tree -L 2 /tmp/myimage/

/tmp/myimage/
├── build
│   ├── image-root
│   └── image-root.log
├── kiwi.result
├── kiwi.result.json
├── kiwi-test-image-live.x86_64-1.15.3.changes
├── kiwi-test-image-live.x86_64-1.15.3.iso
├── kiwi-test-image-live.x86_64-1.15.3.packages
└── kiwi-test-image-live.x86_64-1.15.3.verified

2 directories, 7 files
The build/image-root folder contains the unpacked root file system of the image, which is where the system was installed during the prepare step.
The build/image-root.log file is the log produced by KIWI during the entire building process. It contains all the messages that were displayed on the terminal and possibly more information. You can open it to check if everything went well or if any error messages were displayed.
The file with .packages extension contains a list of the packages installed on the image. It can be useful as well.
To be continued…
Now that you have successfully built and tested your first image, you can start tweaking it to suit your needs.
In the next post, we will see how to do this.
Follow Linux Kamarada on social media to know when it is published.
Continue your reading here.


